Key Takeaway
Practicing specific yoga poses can effectively release tension in the psoas muscles, alleviating lower back and hip pain while enhancing emotional and spiritual wellbeing.
If you spend a lot of time sitting, you may have dealt with iliopsoas pain. This muscle starts at your lower lumbar spine and extends through your pelvis and femur.
Tight psoas muscles can manifest as intense lower back pain, pelvic pain, or tight hip flexors. Experts also say that the vital psoas muscles are closely linked to spiritual and emotional well-being, particularly about lower chakra blockages and energy flow (or qi) throughout the body.
Luckily, there are lots of beneficial yoga poses for relieving iliopsoas muscle pain. Improving your flexibility, posture, and strength through yoga can drastically reduce your risk of injury and day-to-day pain.
Here’s everything you need to know about yoga for the psoas muscles.
Contents
- 1 What is the ilicus psoas?
- 2 9 Yoga Poses for Psoas Release
- 2.1 Supine Knee to Chest Pose (Apanasana)
- 2.2 Supported Bridge Pose (Setu Bandha Sarvangasana)
- 2.3 Boat Pose (Navasana)
- 2.4 Reclined Hero Pose (Supta Virasana)
- 2.5 Tree Pose (Vrksasana)
- 2.6 Warrior I (Virbhadrasana I)
- 2.7 Standing Big Toe Pose (Utthita Hasta Padangusthasana)
- 2.8 Lord of the Dance Pose (Natarajasana)
- 2.9 Pigeon Pose (Adho Mukha Kapotasana)
- 3 Psoas Release FAQs
What is the ilicus psoas?
The iliopsoas is a large compound muscle group connected to the inner hip, lower bag, and femur. As a key stabilizer in the body, it is the strongest and largest hip muscle.
The ilipsoas is the main flexor of the hip joint and is linked to the lower vertebral column, as well as all the associated nerves.
It includes:
- Iliacus: This triangle-shaped muscle is a primary part of the sacrum and includes vital tendons and nerves that channel through the hip and femur.
- Psoas Major Muscle: This powerful muscle is thick and complex. It connects the lower back to the pelvis and thigh.

Tightness in this muscle group is mainly linked to a sedentary lifestyle without enough exercise or flexibility. On the other end of the spectrum, extreme athletes like runners and dancers sometimes deal with psoas syndrome injuries, though they are rare.
Issues with the psoas muscles and hip flexor joints can lead to a range of problems, including:
- Intense lower back pain
- Poor posture
- General hip pain
- Upper-leg pain (due to linkages with the femoral nerve)
- Reduced abdominal strength
- Loss of muscle density
- Loss of flexibility
- Reduced range of motion in the hip
- Pain when walking or running
Research shows that sedentary behaviors are the primary reason for these issues with the iliopsoas. Thankfully, a regular yoga practice can help solve and prevent all of these issues. As a bonus, you can enjoy some much-needed stress relief and mental refocusing.
9 Yoga Poses for Psoas Release
Long periods of sitting in a chair or hunching over a computer can start to take a toll on your back and hips. The psoas muscle becomes tightened and shortened during prolonged sedentary positions.
Because so much weight rests on this pelvic region, you must maintain balance, strength, flexibility, and a healthy pelvic tilt so you can live pain-free.
This yoga sequence includes both standing and seated postures that are specifically designed to release the hip flexors and lengthen the psoas muscle.
Supine Knee to Chest Pose (Apanasana)

Begin by warming up your lower back and directly contracting the iliopsoas muscle by bending the knees in towards the chest. Traditional physical therapy philosophies say that contracting a muscle before lengthening it aids in a deeper release.
Benefits: Warm up, contract and relax the iliacus muscles to bring awareness to the area
How to do Apanasana:
- Lie on your back in a Savasana (Corpse Pose) position with your legs outstretched and neutral
- Keep your right leg straight as you inhale, and bend your left leg to a 90° angle.
- On an exhale, create resistance by pressing your thigh into your hand and vice versa. Repeat for a few breaths to activate the muscles.
- On an inhale, hug the left knee into your chest and place your left hand on top of the thigh.
- Notice any sensations on the left side of your waist and lower back.
- Repeat on the other leg.
- Lastly, hug both knees into the chest and exhale as you try to flatten your back completely to the mat.
Supported Bridge Pose (Setu Bandha Sarvangasana)

Next in the sequence, you want to activate the psoas major from the opposite direction. This pose helps combat an anterior pelvic tilt for reduced lower back pain.
Use a yoga block or yoga bolster beneath the sacrum for added support and comfort.
Benefits: Relieve back pain and neutralize an anterior tilt of the pelvis
How to do Setu Bandha Sarvangasana:
- Begin laying down flat on your back with legs outstretched about hip-width distance.
- Bend your knees and bring your feet flat to the floor. Try to touch your fingertips to the back of your heels.
- On an inhale, engage the glutes and slowly lift your pelvis. The goal is not to arch the back into an elevated bridge pose. Instead, keep your shoulder blades and upper body firmly planted on the mat. Optionally, place a block under your tailbone.
- The thighs, knees, and feet should remain parallel throughout.
- Hold and breathe, trying to maintain a flat spine as you reach your fingers toward your heels, and slightly bend your chin to keep an elongated neck.
Boat post is another great floor position for working both sides of the psoas. You bring your spine and legs into a “V” shape while staying as elongated as possible. This simultaneously strengthens your core and improves balance.
Benefits: Strengthen core and work both sides of the psoas major
How to do Navasana:
- Begin in a seated position with your knees bent and your feet on the mat.
- On an inhale, engage your core and raise your feet. Lean back slightly to balance your sitting bones.
- Begin to straighten both legs out while maintaining an ultra-straight spine. Your legs should reach a 45° angle with your lower body while your torso stays upright.
- Hold the “V” shape as you breathe.
- Slide your shoulder blades down your back and straighten your arms to the side parallel to the floor with your palms facing upward.
- After 5 breaths, exhale and release your legs to sit back up.
Reclined Hero Pose (Supta Virasana)
This restorative pose continues to stretch open the hips and thighs. It lengthens the front of the psoas muscles and pelvis to gently soothe and stretch out tension.
Note that this pose can be challenging for those with knee pain, so adjust accordingly.
Benefits: Stretch the deep hip flexors (front psoas) as well as thighs, shins, and ankles; relieve chronic low back pain
How to Do Supta Virasana:
- Begin with your knees bent, seated atop your feet.
- Place your hands on each side of your thighs and walk your hands back as you shimmy your butt to the floor between your feet. You will feel your hips and knees slightly rotating internally toward the center of the body.
- You may wish to put a yoga blanket or bolster beneath the lower back.
- Lean back further to come onto your forearms. Keep your knees close together, and don’t let them pull apart.
- If you don’t feel any pain, exhale into a fully reclined position and feel a deep release in your upper thigh muscles and hip flexors.
- Hold for 5–10 breaths, then release by raising your forearms and pressing upward.
Tree Pose (Vrksasana)

Moving into a standing sequence, Tree Pose provides a psoas stretching one side at a time. It is also a balancing pose that improves core stabilization and focus.
Benefits: Stretch and stabilize the psoas one side at a time
How to Do Vrksasana:
- Begin in a standing position with your feet hip-width apart.
- Root into the floor and shift your weight into your left foot, hovering your right foot off the floor.
- Keep the standing left leg straight and strong, with only the slightest micro bend in the knee.
- On an inhale, bend your right knee and bring the bottom of your right foot to touch your inner left thigh.
- If you don’t have this flexibility, you can place the foot on your shin. If you want a deeper stretch, bring the outside of your right foot to the left hip for a full external rotation.
- Focus your gaze forward and press your foot into your leg for added stability. Keep your hips as square and aligned as possible. Squeeze your glutes to further open the hip.
- Hold for 5-10 breaths, then repeat on the other leg.
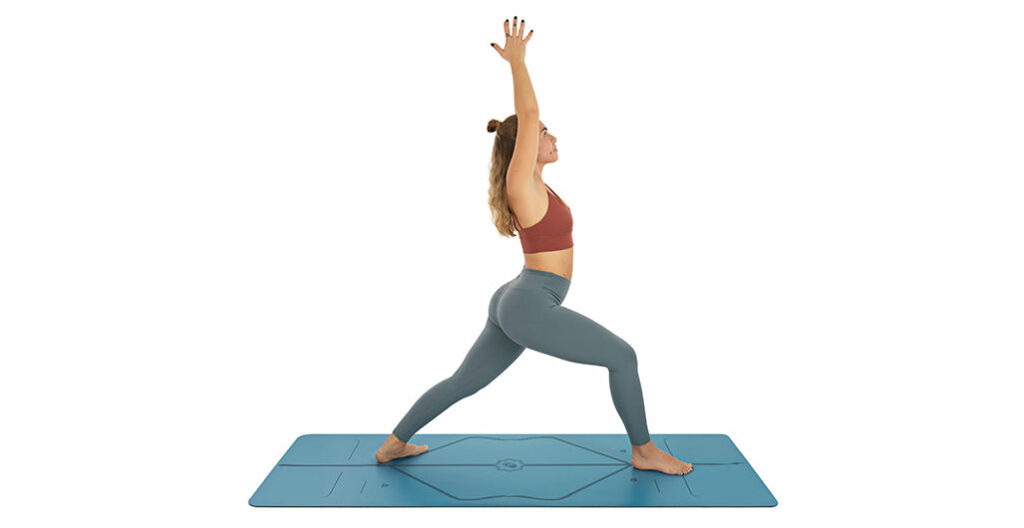
Warrior I (Virbhadrasana I)

Warrior poses are commonly part of Sun Salutation sequences. This asana stretches the back leg and lengthens each side of the psoas while holding the torso tall.
Benefits: Strengthen and stretch tight hips, thighs, and hamstrings
How to Do Virabhadrasana I:
- Begin in a Downward Facing Dog position.
- On an inhale, lift your right leg behind you and exhale to bring the right foot forward between your hands.
- Keep your right knee at a 90° angle as you inhale and lift your torso.
- Adjust the left foot to the corner of the room (about a 45° angle) and feel the outer sole push into the mat.
- Inhale your arms upward with your palms facing each other. Relax the shoulders down your back and shift your drishti (gaze) slightly upward.
- If necessary, exhale to deepen the posture and feel a greater hip opening. Keep your hips facing forward.
- To release, push off the back leg and step forward. Repeat with the left leg.
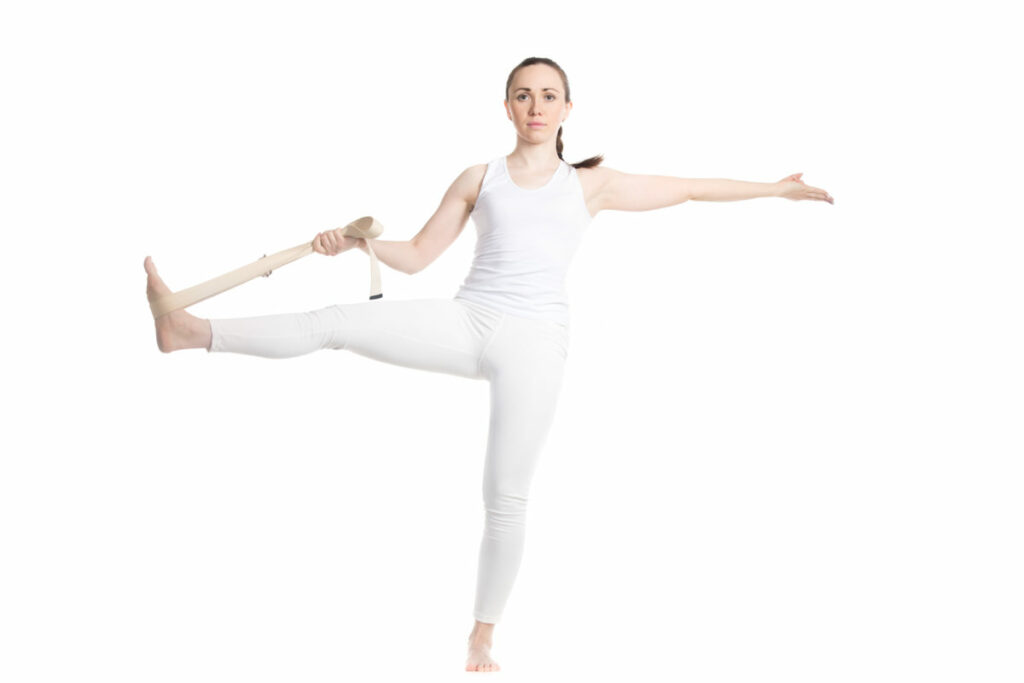
Standing Big Toe Pose (Utthita Hasta Padangusthasana)

This pose can be practiced in a standing or floor sequence with similar results. The standing pose adds an extra element of balance and strengthening during the hip flexion movement. You can also feel your psoas major externally rotating.
If you can’t reach your toes, you may want to use a yoga strap on the lifted foot to prevent your back from rounding.
Benefits: External hip rotation and strengthening
How to do Utthita Hasta Padangusthasana:
- Begin in Mountain Pose with your feet shoulder-width apart and arms at your sides.
- On an inhale, bend your right leg and loop your fingers around the big toe (or place your strap under the right foot).
- Stand back up to a straight position with the spine aligned, pelvis slightly tucked, and glutes and core engaged.
- Your standing left leg should be strong, with a slight micro-bend in the left knee.
- On an inhale, begin to press and extend your right leg forward, lifting your chest.
- Hold this position for 3-5 breaths, optionally extending the lifted leg out to the side for more opening.
- Slowly release the lifted foot, and repeat with the left foot.
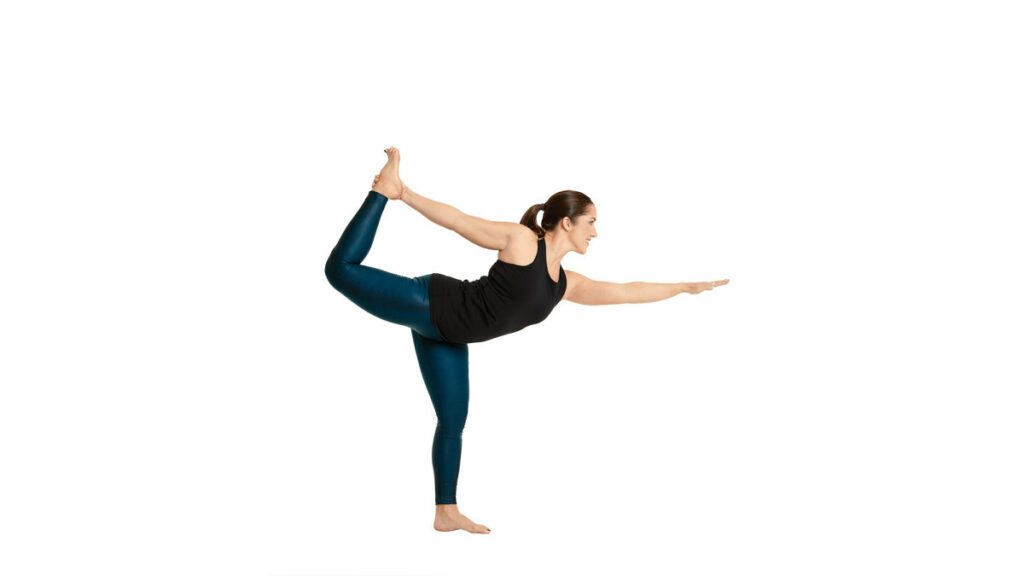
Lord of the Dance Pose (Natarajasana)

This final balancing pose lengthens each side of the psoas flexor and upper thigh by pressing the back leg into your palm. It also opens the heart and spine for a greater range of motion.
Benefits: Deep stretch in hip flexors, thighs, and whole spine
How to do Natarajasana:
- From Mountain Pose, shift your weight into one leg and bend your right knee upward.
- Use your right arm to grasp the inside of the right foot. Realign your hips so they are both square and facing forward.
- Inhale your left arm straight up the ceiling with your palm facing forward.
- Kick your lifted foot back and up, using the pressure against your hand to help balance as your torso slightly moves forward.
- Feel a lengthening across your right thigh as you continue engaging the glute and kicking upward. Your lower spine will slightly arch, but it’s important not to exaggerate this spinal flexion.
- Keep your torso lifted and gaze upward as you continue kicking.
- Hold for 4–5 breaths, then repeat on the other side.
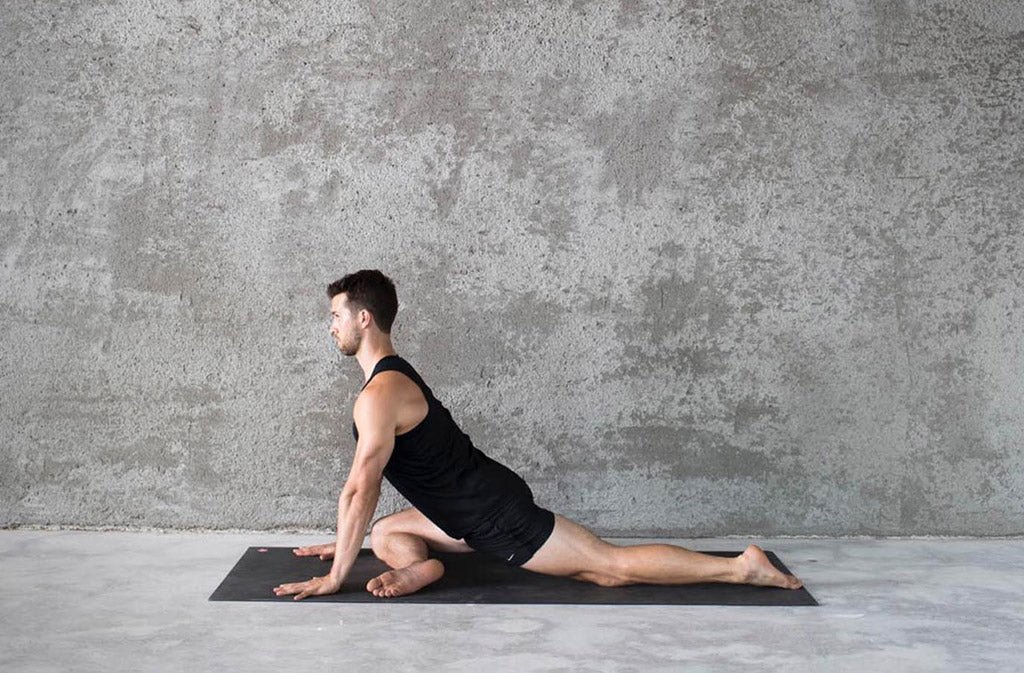
Pigeon Pose (Adho Mukha Kapotasana)

Round off your psoas yoga sequence by returning to the floor with a restorative pigeon pose. This external hip rotation feels incredible on your glutes, thighs, and psoas muscles.
For a more in-depth guide on hip release and modifications of Pigeon Pose, check out this article.
Benefits: Help reduce lower back pain and externally open the hips
How to do Ado Mukha Kapotasana:
- Begin in a tabletop position with your hands square beneath your shoulders and your ankles square beneath your hips.
- Inhale to bend your right leg forward and place the right foot beneath your left hip. Rest your right sitting bone on the mat so your right hip externally opens.
- Slide the left leg straight behind you with the left toes resting on the floor.
- If your hips have started to sway or twist to one side, realign them forward by imagining the left hip reaching toward the front of the mat.
- If this feels comfortable, come down to your forearms and feel an even deeper stretch on the outside of your right hip.
- By keeping your weight evenly distributed throughout the body, you can come all the way down to the mat if your flexibility allows.
- Exhale and melt downward, letting gravity do the work. Hold for 5–10 breaths.
- Repeat on the other side with the left knee bent and the left foot under the right hip.
Psoas Release FAQs
How do you release the psoas muscle?
The psoas muscle can be released through hip-opening yoga poses and stretches. Positions that improve a pelvic tilt and practice internal or external rotation of the hips are particularly useful. You can also briskly walk or run to help loosen the area.
Why does the iliacus get tight?
A sedentary lifestyle is the primary reason for a tight iliacus muscle. Prolonged sitting, a lack of exercise, and an absence of regular stretching are the most common reasons for this muscle to become tense. In rare cases, the muscle can shorten due to athletic overuse injuries.
What is iliacus pain like?
Iliacus pain can range from a numb throbbing to an intense aching. The pain can be in the groin, hips, pelvis, tailbone, thighs, or lower stomach.
What exercises work the iliacus?
Yoga is one of the best exercises for the iliacus muscle because it simultaneously lengths and strengthens the hip flexors. Hip-opener postures like Seated Knees to Chest, Dancer Pose, Pigeon Pose, and Supported Bridge Pose can provide a therapeutic psoas release.


