
Listen to this article:
Key Takeaway
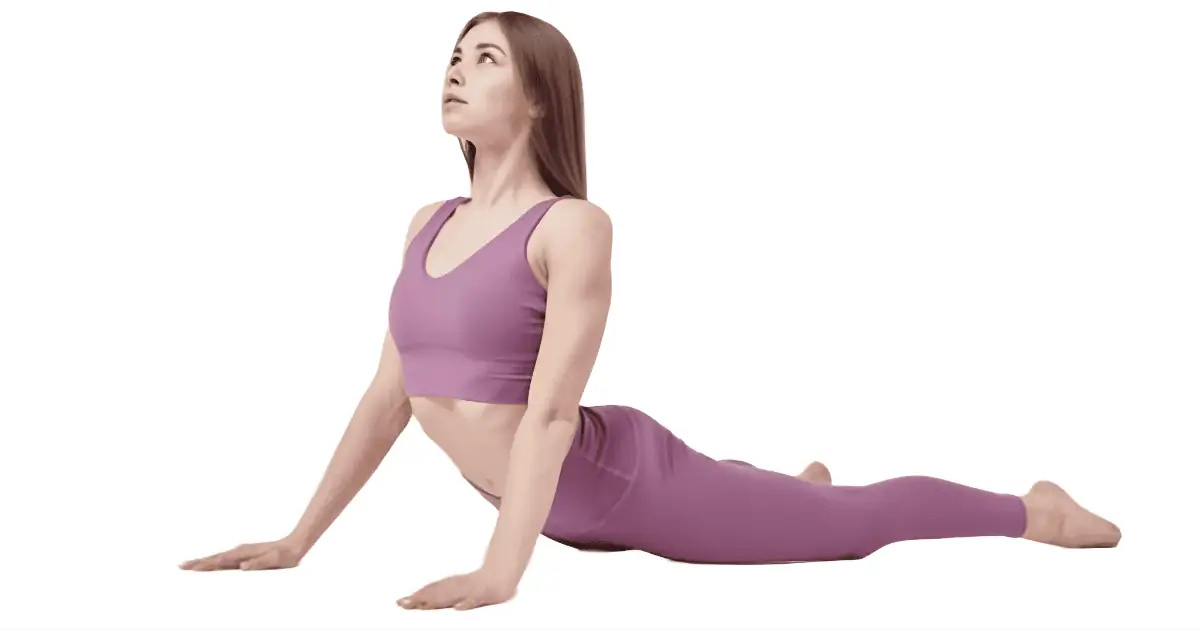
Seal Pose, an advanced variation of Sphinx Pose, enhances spinal flexibility and emotional release, targeting the kidney and urinary bladder meridians to alleviate fear and promote courage.
| SEAL POSE | |
|---|---|
| Alternate name: | Bhujangasana |
| Difficulty level: | Intermediate |
| Pose category: | Backbend Prone Heart opener |
| Muscle groups: | Erector Spinae (Back) Abdominals (Stomach) Pectoralis Major (Chest) Serratus Anterior (Ribs) Deltoids (Shoulders) Triceps Brachii (Arms) |
| Physical benefits: | Improves posture, opens lungs, alleviates backaches. |
| Therapeutic applications: | Back pain, stress relief |
| Preparatory poses: | Sphinx Pose (Salamba Bhujangasana) Child’s Pose (Balasana) Seated Forward Fold (Paschimottanasana) |
| Counterposes that follow well: | Child’s Pose (Balasana) Crocodile Pose (Makarasana) Seated Forward Fold (Paschimottanasana) |
| Chakras activated: | Heart Chakra (Anahata Chakra) Solar Plexus Chakra (Manipura Chakra) Sacral Chakra (Svadhishthana Chakra) |
| Most helpful prop: |  Bolster under stomach; reduces lumbar pressure. See latest price |
Heart openers are some of my absolute favorite yoga poses. They invite us to embrace vulnerability and courage simultaneously, exploring the subtle balance between strength and surrender.
Seal Pose is a perfect example of these qualities. It’s an intense spinal extension and chest opener, yet the front of the body is grounded firmly to the earth. It channels attention to the lumbar and belly regions, employing yin energy to cultivate resilience.
Integrating this asana into your practice unlocks a version of inner fortitude that harmonizes the mind with the body’s capabilities.
Let’s dive into the magic of Seal Pose. I’ll guide you through it step-by-step; then, we’ll explore its many physical and energetic benefits and how it can be a powerful tool for transformation both on and off the mat.
Watch our recommended steps for entering, holding, and exiting the pose.
Contents
Get to Know Seal Pose
My first introduction to this posture was as a student in a Yin Yoga class, but you might also come across it in a Hatha or Vinyasa sequence.
Technically, this asana is an advanced variation of Sphinx Pose, known in Sanskrit as salamba bhujangasana, or “supported Cobra Pose.” For this reason, you also might hear it called “Cobra Pose Arms Spread Variation.”
As you might have guessed, its English name comes from its resemblance to a seal raising its head and chest from the ground as it basks in the sun.
You can categorize Seal Pose in several ways—prone, backbend, and heart opener, to name a few. Since the posture is a deeper expression of Sphinx, it is appropriate for intermediate to advanced students.
Spot the Difference — Seal, Cobra, Upward Facing Dog
Seal looks pretty similar to Cobra Pose or Upward Facing Dog; however, there are critical differences in alignment and muscle engagement. All three poses fall under the same category of prone spinal extension. Here’s a cheat sheet to remember the key differences between them
| Asana | Placement of hands in relation to the shoulders | Arms | Feet, legs and hips | Muscle engagement – core, glutes, legs |
|---|---|---|---|---|
| Seal | In front | Straight | Grounded | Core engaged, glutes and legs relaxed |
| Cobra | Directly under | Bent | Grounded | All engaged |
| Upward Dog | Directly under | Straight | Tops of feet ground, legs and hips lifted | All engaged |
To summarize, this “Cobra Pose Arms Spread Variation” is more of a Yin or restorative pose, activating specific energy channels, while the others use more muscle activation. To explain it better, let’s highlight the energetic effects of the asana.
Energetic Intention of Seal Pose
When practicing Seal Pose in Yin Yoga, you often hold the position in stillness for a couple of minutes. However, just because your body is still there doesn’t mean things aren’t flowing internally. This asana holds intense transformational power in affecting the body’s energies.

Yin Meridian Focus
Yin Yoga centers around meridians—energy highways in our bodies. Seal Pose targets specifically the kidney and urinary bladder meridians. Any meridian becoming blocked or stagnant affects us emotionally and physically.
The kidney and urinary bladder meridians relate to the element of water and govern feelings of fear, courage, and wisdom. By practicing this deep compression of the lumbar spine in Seal Pose, you encourage energy flow through these pathways, allowing yourself to let go of fear and insecurity.
Chakra Connection
As a heart-opening posture, Seal Pose stimulates the heart chakra. And, as the front body stretches out, the Sacral and Solar Plexus chakras are more activated. The emotional qualities of these chakras reflect the same as the kidney and urinary bladder:
- Heart chakra: courage, love, joy
- Solar plexus chakra: self-esteem, assertiveness
- Sacral chakra: confidence, openness, free of anxiety
So, if you’ve been self-conscious, anxious, fearful, or closed-off, this asana can help you release those feelings and bring your whole being into a happy, harmonious flow.
Seal Pose Step-by-Step Guide
Seal Pose begins with a prone position (lying on your belly), moves through Sphinx, and then progresses to the final straight-arms position. Taking time to arrive at the final expression is crucial to avoiding injury risk. Follow these steps to enter and exit the asana safely.
Beginning Position
- Lie down on your belly with your arms at your sides and your forehead on your mat.
- Separate your feet to a hip-width distance or a little wider.
- Inhale deeply, and as you exhale, let your whole body relax.
Moving Into Sphinx

- Bring your arms forward. Begin to lift your upper body off the mat and bring your elbows directly underneath your shoulders.
- Align your forearms parallel to the long edges of your mat. Press your forearms and palms into the ground, fingers spread wide.
- Lift your chest and head as you press the floor away. Widen your collarbones and shoulder blades.
- Make space between your ears and shoulders.
- Keep your gaze on the floor a few feet in front of you, keeping length in your spine.
- Stay in this position for a few breaths.
Deepen the Stretch
- Activate your core muscles by pressing your navel in and up.
- Take a deep inhale. Press your palms firmly into the floor and straighten your arms slowly as you exhale.
- You’ll feel deep compression in your lumbar spine, which is normal. If you feel any shooting pain sensations, lower down gently.
- Keep your head aligned with your spine by gazing forward.
- Hold your full expression of the asana for 7 to 10 slow, deep breaths.
Exiting Safely
- With an exhale, bend your elbows and lower them down to your forearms.
- On your next exhale, lower down and return to belly savasana.
In my yoga practice and teaching, I’ve discovered that breath awareness is the secret to success in this posture. Whether moving between positions or holding the stretch, keep your mind highly attuned to your breathing, and you’ll be blissfully basking like a seal on a sunny beach.
Alignment Tips and Cues
Here are some of my alignment pro-tips for students working towards refining their alignment or new yoga teachers wondering how to cue this asana.
- Hand Placement: Your hands are your anchor in this asana. Plant your palms firmly on your mat with your fingers spread wide.
- Mindful Leg Placement: Pay close attention to how you position your legs. They should be hip-width apart or a little wider, toes pointing straight back with the tops of the feet on the floor.
- Lift Gently and Slowly: Use each inhale and exhale to guide your movements. Try to use the entire length of your breath to move gradually through each step rather than popping into position.
- Position of the Elbows: Keep a micro-bend in your elbows to avoid hyperextending, even when your arms are straight. You can even keep them slightly bent if straightening the arms entirely is too intense.
- Shoulder Power: The position of your shoulders is vital in Seal Pose. They must remain engaged but not shrugged up to your ears. That way, you’ll build strength without creating tension.
- Neck Position: Keep your neck long and neutral, aligning it with the rest of your spine. Avoid throwing your head back, which can strain those delicate muscles and vertebrae.
- Hold With Stillness: Aim to maintain this expression of this asana for 1 to 2 minutes. Stillness and time are vital components of Yin postures, allowing the stretch to reach the body’s soft tissues.
- Breathe Deeply: Concentrate on taking deep, even breaths from start to finish. Breath control is crucial for maintaining focus and avoiding injury.
Seal Pose Versus Sphinx Pose
As I mentioned when introducing this asana, Seal Pose is an alternate version of Sphinx Pose. Visually, you can see the difference due to the straightened arms. Let’s explore the other aspects that set these poses apart.
- Intensity: This variation takes the gentle curve of Sphinx Pose up a notch. By straightening the arms, it lifts the torso higher off the ground. This action creates a more pronounced arch in the back compared to Sphinx.
- Arm Strength: Unlike Sphinx, where forearms support body weight, Seal requires strong arms. Straightened arms bear more load, challenging your upper-body strength.
- Deeper Abdominal Stretch: A deeper backbend means the front of your body lengthens more. You’ll feel the stretch in your abdominals intensify as you straighten your arms.
- Deeper Compression: The more intense curve in your back means deep compression for your lumbar spine. In Sphinx Pose, the lower back is more elongated.
For a more in-depth explanation of the differences between Seal, Sphinx, Upward Facing Dog, and Cobra Pose, watch this helpful video:
Benefits of Practicing Seal Pose
Seal pose is a powerful tool for improving spinal health and lung capacity. It can also soothe backaches and release physical and mental tension.
Physical Perks
- Improves Posture: Your lumbar region—the lower part of your spine—gets a good stretch in this position. It helps correct slouching caused by hours at a desk or on a couch. This pose helps restore the natural curve of the lumbar area.
- Opens Lungs: As you expand your chest, your lungs have more room to expand. This allows for deeper inhalation and more complete exhalation. The result is a feeling of calmness as more oxygen enters your body.
- Alleviates Backaches: Tight muscles in your back often lead to pain. Practicing this asana regularly can mean fewer days spent dealing with annoying back pain. It relaxes the stomach area, too, which often holds stress without our realizing it.
Mental and Emotional Effects
Yoga teachers like me love this asana for its holistic benefits, too. Here are some of my favorite reasons to add Seal Pose to my yoga sequences:
- Energizes and boosts mental clarity: Combining deep breathing and spinal extension, this pose can improve oxygen flow and circulation, which may contribute to clearer thinking and reduce mental fatigue.
- Promotes relaxation: This restorative asana stimulates the body’s relaxation response by activating the parasympathetic nervous system, which can help reduce anxiety and promote a sense of calm and well-being.
- Encourages mindfulness and builds focus: The breath awareness required of this posture encourages mindfulness and present-moment awareness. With your mind wholly focused on your experience, you build mental focus.
- Facilitates emotional release: This asana targets the kidney and urinary bladder meridians and the heart, solar plexus, and sacral chakra, helping you release feelings of fear and insecurity while promoting a sense of peace and grounding.
Contraindications and Cautions
Seal Pose is intense, so it may not be for everyone. If you experience any of the following medical conditions, you should use props, modifications, or possibly skip this asana entirely:
- Back Injury Risks: People with recent or chronic back injuries should avoid this asana, as it can aggravate existing conditions. If you experience chronic issues or are recovering from an injury, consult a physiotherapist or doctor before doing any backbends.
- Carpal Tunnel Syndrome: The weight-bearing aspect of the posture can exacerbate wrist pain and issues associated with carpal tunnel syndrome. If your wrists are weak or tingly, modify the position or pick an alternative that keeps your wrists happy.
- Pregnancy Precautions: Pregnant yogis in their first trimester will have no problem with this asana. Beyond that, you can try a modified version with the thighs elevated on a bolster. However, you’ll need to alter your entry into the position to avoid lying on your belly. Always consult your physician before trying a new asana while pregnant.
Sensations vs Pain
Understanding the distinction between sensation and pain is a vital body-awareness skill in yoga. Discomfort is normal; it means your muscles are stretching and growing stronger. But if you feel a sharp pang—especially in backbends—it’s a red flag to stop immediately! Pain indicates something isn’t right, and pushing through could lead to injury.
To help my students understand this distinction, I remind them that sensation may be uncomfortable, but you can breathe through it. Pain, on the other hand, often restricts your breathing.
Modifications and Props
In restorative and Yin Yoga, teachers highly encourage using props to make the poses more accessible and relaxing. Here are a few ways to use yoga props to enhance your experience:
- Yoga blanket: If this position is uncomfortable on your hips, place a folded blanket underneath yourself for extra cushion.
- Bolster: Slide a bolster lengthwise underneath your stomach to support and take some pressure off your lumbar area. Or, turn it horizontally and place it under your arms. Then, your elbows can stay partially bent, resting on the bolster, providing a less intense stretch.
A high-quality, thick yoga mat is ideal for poses like this one. Check this out!

lululemon’s The Workout Mat 6mm
Complementary Poses
Whether you do this pose in Yin Yoga, Hatha, or Vinyasa sequence, such a powerful backbend should be balanced with yoga poses that complement the deep compression in the lower back.
Child’s Pose Release
Balasana is the ultimate counter pose for any backbend. It bends the spine in the opposite direction, promoting mobility. Your entire back will get a nice stretch, too.
Crocodile Resting Posture
In between rounds of intense backbends, Crocodile Pose serves as an excellent resting spot. Lying flat on your belly wwith yourforearms stacked under the forehead gives your back a break.
Forward Bending Balance
Seated Forward Fold is another excellent choice for a counter pose. By folding forward, you counteract the spinal extension and provide a comprehensive stretch to your entire posterior chain from your calves to your upper back.

Advanced Variations
Seal Pose doesn’t always have to be a static yin posture. Try an advanced variation to introduce new challenges to students seeking to deepen their practice.
Single Leg Bend
Try bending one leg at a time towards the crown of your head. This engages the hamstrings, enhances flexibility, and is the first step in working towards advanced postures like Raja Bhujangasana or Scorpion Pose.
Dynamic Seal-Sphinx Flow
Give your arms a workout by flowing between these postures, feeling each muscle as you move. Remember to move slowly, lifting with your inhale and lowering to your forearms with your exhale.
Conclusion
Seal Pose offers many benefits, from spinal flexibility to mental relaxation. It can be an intense experience, both physically and emotionally. But remember, your breath is your secret weapon. Let each inhale fill you with energy and release tension with each exhale.
I love how this yin posture builds body awareness, allowing you to focus on sensation over shape. Chasing after the perfect shape of a yoga pose can lead to trouble. Instead, tune into the sensations in your body — especially any signs of discomfort or pain — and adjust accordingly. Try a less intense variation and use as many props as you need.
If you’ve never practiced Yin Yoga before, I encourage you to try it out, starting with this pose! Roll out your mat, get in tune with your energy and emotions, and feel the transformative power of Seal Pose today!
FAQs
What is Seal Pose, and what are its benefits?
Also called “Cobra Pose Arms Spread Variation,” this pose is a backbend in yin yoga that stretches the spine and opens up the chest. Regular practice can improve spinal flexibility, promote better posture, and alleviate pain in the lower back area.
Is this posture suitable for beginners?
I recommend Seal Pose for intermediate yoga students. If you are a beginner, start with Sphinx Pose, and when you feel comfortable there, try progressing into this deeper expression.
Can Seal Pose help with stress relief?
This posture helps soothe stress by encouraging deep breathing and fostering present-moment awareness. You can breathe deeply in this pose, boosting oxygen flow to the body and brain and producing a calming effect.
Are there any contraindications for practicing Seal Pose?
People suffering from herniated discs, chronic back pain, wrist or shoulder injuries, carpal tunnel syndrome, or severe arthritis may need to modify or skip this posture entirely.
What are some common mistakes to avoid when performing the Seal Pose?
Common mistakes include hyperextending the arms, allowing the chest to sink, and moving too quickly, leading to discomfort or injury. To avoid these issues, engage your core muscles and take your time moving into the position.