
Listen to this article:
Key Takeaway
Practicing the Wind-Relieving Pose can significantly aid in digestive health and ease back pain. Following the step-by-step instructions ensures proper form and maximizes the pose’s effectiveness. Incorporating this asana into regular yoga sequences can improve overall health, promoting physical and mental wellness.
| WIND RELIEVING POSE | |
|---|---|
| Alternate name: | Pavanamuktasana |
| Difficulty level: | Beginner |
| Pose category: | Abdominal stretch (Single-Leg Version) Supine, restorative yoga pose (Both Legs at Once) |
| Muscle groups: | Abdominals (Single-Leg Version) Abdominals, hip flexors, glutes (Both Legs at Once) |
| Physical benefits: | Digestive relief Muscle tension release |
| Therapeutic applications: | Relieves bloating and gas Stimulates bowel movements Releases muscle tension in the glutes and lower back Enhances breathwork for relaxation |
| Preparatory poses: | Savasana |
| Counterposes that follow well: | Twisting yoga poses Transitioning to Savasana |
| Chakras activated: | Manipura Chakra (Solar Plexus Chakra) |
| Most helpful prop: |  Cushion or folded blanket under the head and neck for support during extended holds, especially helpful for relaxation. See latest price |
Many people are aware of yoga’s health and wellness benefits. In my experience as a yoga instructor, I’ve learned that some of the most beneficial yoga poses are the most simple.
That’s what I love about Wind-Relieving Pose. This beginner-level, supine, restorative yoga pose perfectly shows how a gentle stretch can produce powerful results. This pose offers versatile benefits that cater to a wide range of needs.
Once you learn how to use this posture in your yoga sequences, you’ll be amazed at how it can improve your day-to-day health. Intrigued? Roll out your yoga mat and join me on a deep dive into this rejuvenating and relaxing asana.


Watch our recommended steps for entering, holding, and exiting the pose.
Contents
- 1 Getting to Know Wind-Relieving Pose
- 2 Steps for Practicing Wind-Relieving Pose
- 3 Contraindications and Cautions
- 4 Modifications and Variations for Personalized Practice
- 5 Key Health Benefits and Therapeutic Applications of Wind-Relieving Pose
- 6 Integrating Wind-Relieving Pose into Yoga Sequences
- 7 Final Remarks
- 8 Frequently Asked Questions
- 8.1 What is the Sanskrit name for the wind-relieving pose?
- 8.2 Are there modifications for the wind-relieving pose?
- 8.3 What are the key health benefits of practicing this pose?
- 8.4 What are the contraindications for Wind-Relieving Pose?
- 8.5 How should I use the wind-relieving pose in my yoga sequences?
- 8.6 Was this helpful?
Getting to Know Wind-Relieving Pose
Origin and Name
Wind-Relieving Pose is more or less a direct translation from its Sanskrit counterpart, Pavanamuktasana. This name comes from three words:
- Pavana, or “wind.”
- Mukta, meaning “release.”
- Asana, signifying “pose.”
Pavanamuktasana, or the wind relieving pose, is significant in the vast library of yoga poses, appearing in the 15th-century yogic text Hatha Yoga Pradipika as one of 84 foundational postures.
Many yoga teachers will confirm that the name of this asana perfectly describes its function — if you have gases or air trapped in your digestive tract, Pavanamuktasana will help you release them!
Steps for Practicing Wind-Relieving Pose
I’ve noticed yoga teachers use two popular variations of Wind-Relieving Pose. I’ll provide the steps for each version here so you can try them both and discover which method feels best for your body.
For each version, begin by lying on your yoga mat in Savasana with your legs separated slightly and arms at your sides, palms facing up. Inhale deeply to prepare your body, and exhale to release any lingering tension.
Single-Leg Version

- With an inhale, lift your right leg and bring your right knee toward your chest. Grasp the front of your right shin with both hands.
- As you exhale, open your right leg to the side, squeezing your leg close to your body.
- Wrap your right arm around your right leg if you’re able, or keep holding your leg using your right hand.
- Use the strength of your arm to hold your leg in place, allowing your right hip flexor and glutes to relax.
- Keep your breath flowing, breathing deep down into your belly.
- Hold for 1 to 3 minutes. Then, release gently and extend your right leg along the floor, returning to Savasana.
- Repeat this process with your left leg, bringing your left knee toward your chest and opening to the side.
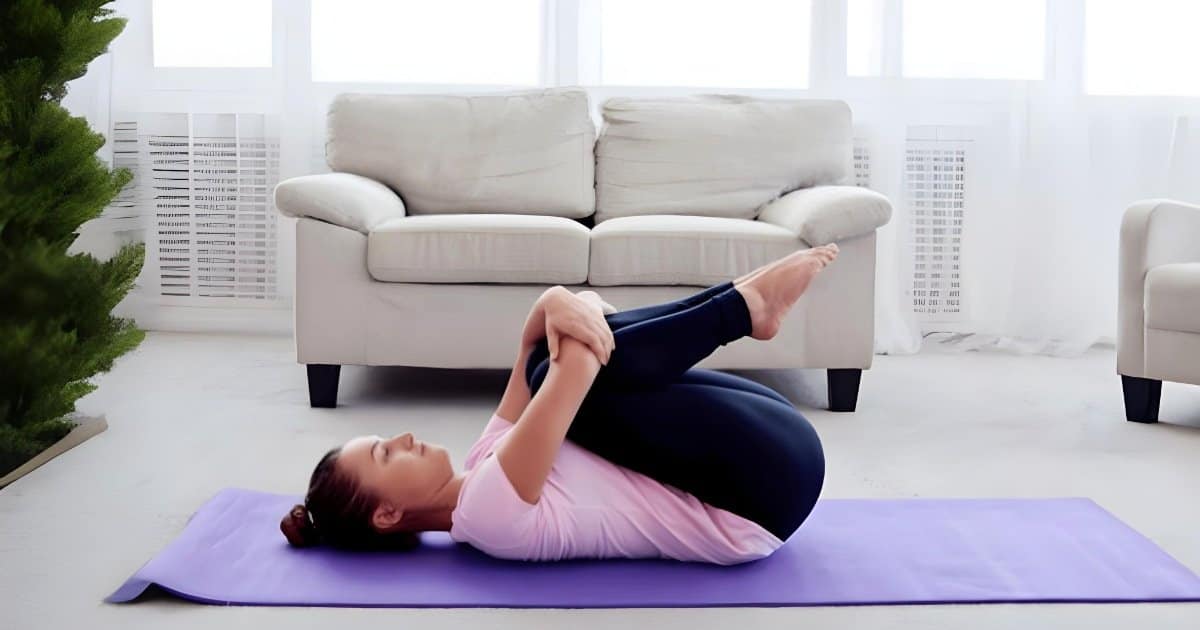
Both Legs at Once
- As you inhale, lift both legs and draw your knees toward your chest. Wrap your arms around your legs, placing your hands on the fronts of your shins.
- As you exhale, squeeze your legs to press gently on your lower abdomen.
- Keep your lower back and tailbone on the floor. If it feels comfortable for your neck, you may lift your head and bring your forehead toward your knees.
- Hold this position, arms wrapped around your legs, breathing deeply for a minute or two.
- Each time you exhale, squeeze your legs toward your chest to gently press on your lower abdomen. You may also add some subtle movement, rocking gently from side to side to relieve more tension in your back.
- When ready, lower your head to your mat and release gently, returning to Savasana.
I prefer to start with the single-leg Wind-Relieving Pose, beginning with the right leg, moving to the left leg next, and then bringing both knees into my chest to finish this mini-sequence.
However, you might prefer one version over the other. Get curious and try both! That’s the beauty of yoga — you can adapt the practice to what works for you.
Contraindications and Cautions
Wind-Relieving Pose is a beginner-level asana and is relatively accessible. Even so, there are some instances which require caution.
If you’re recovering from abdominal surgery or a hernia, are in your 2nd or 3rd trimester of pregnancy, or are less than one month postpartum, you should avoid any yoga poses that press the abdomen.
While I’ve found this posture helpful at relieving mild back tension, people with severe back pain or spinal injuries like slipped or herniated discs should consult with their doctor before trying this pose. While some may find relief in gentle stretching, others might experience worsening symptoms.
Modifications and Variations for Personalized Practice
Many yoga teachers use Wind-Relieving Pose for relaxation, which means your body should be comfortable. Since everyone’s body is different, you might need to take extra steps to relax fully in this asana.
- A cushion or folded blanket supporting your head and neck can be helpful when holding the pose for several minutes.
- In the single-leg version, keep your opposite leg bent with your foot flat on the floor. This is especially helpful for those who have tight hips.

Hugger Mugger Recycled Plaid Yoga Blanket
See latest priceVariations to Support Larger Bodies and Limited Mobility
Bringing your knees toward your chest might feel challenging, depending on your body type, structure, or mobility. If so, try these accessibility modifications.
- Legs open: Instead of bringing your knees to your chest, open them to the sides to point toward your armpits. This also gives you an extra stretch in your inner thighs and groin.
- Yoga strap: If you can’t wrap your arms around your leg, place a strap around the front of your shin. Hold the ends of the strap in your hands and gently pull your leg toward your body.
- Chair variation: Sit in a chair toward the front of the seat with your back straight. Scoop your hands under your right thigh and lift your right knee toward your chest. Hold for a few breaths, then release. Repeat the stretch with your left leg. You may also use a strap or towel under the thigh if you cannot reach your hands underneath.
Hip Lengthening
Sometimes, a deeper stretch is the key to more profound relaxation. Using a yoga block to help lengthen your hip flexors feels terrific, especially after long periods of sitting.

lululemon’s Lift and Lengthen Yoga Block
To try this, lie on your yoga mat with both knees bent and your feet flat on the floor. Lift your hips and place a yoga block horizontally under your sacrum. Once you’re in position, follow these next steps:
- Lift your right leg and bring your right knee toward your chest with your hands on the front of your shin.
- Slowly extend your left leg along the floor. Keep your foot flexed and press your heel into your mat, toes pointing up. Hold the stretch for several deep breaths.
- To release, reverse the previous steps. Bend your left leg, plant your foot on the floor, and then release your right leg.
- Repeat the stretch on your other side, pulling your left knee in and extending your right leg.
With your hips elevated on the yoga block, you’ll feel a more intense release in the hip of the extended leg.
Key Health Benefits and Therapeutic Applications of Wind-Relieving Pose

Digestive Relief
Wind-Relieving Pose relieves bloating and gas and stimulates bowel movements, too.
When you practice this pose using one leg at a time, always begin on your right side. Your right knee will press gently on your ascending colon while your left knee compresses and stimulates your descending colon.
This right-left order moves gas or waste along the digestive tract in its natural direction, offering efficient relief from constipation or other abdominal pains.
Muscle Tension Release
This pose works wonders on muscle tension in the glutes and lower back. Certain variations also open the inner thighs or lengthen the hip flexors, offering a deep stretch that releases built-up stress.
Breathwork Benefits
Practice diaphragmatic breathing in Wind-Relieving Pose to enhance its relaxing effects. Slow, deep breaths activate your body’s “rest and digest” mode.
- Inhale deeply without lifting your chest.
- Draw your breath into your belly, feeling your upper abdomen expand as your diaphragm moves downward.
- Keep your exhales steady and long.
Use your breaths to release physical tension consciously. Inhale and concentrate on softening areas that feel tight; as you exhale, allow your muscles to relax.
Practicing this breath awareness can increase mindfulness and help relieve mental stress, too! Focusing on each inhale and exhale brings your attention to the present moment, reducing anxiety and boosting mental clarity.
Integrating Wind-Relieving Pose into Yoga Sequences
Wind-Relieving Pose is helpful in many yoga sequences and pairs easily with other passive yoga poses. Here are some of my favorite ways to incorporate this posture into my routine.
- Warming up: Use this stretch at the beginning of your yoga session to gently release your lower back and hips in preparation for more dynamic movement.
- Yin yoga: To experience the more therapeutic benefits of this asana, use it in a Yin yoga practice. Squeeze one knee in at a time and hold each side for 2 to 5 minutes to experience deep release in the soft tissues surrounding your hips.
- With twisting yoga poses: I like to use this asana alongside spinal twists, which also target digestive health.
- Transitioning to Savasana: Using this pose at the end of a sequence before Savasana serves as a bridge between active practice and complete relaxation, preparing you for deeper rest.
- In bed: I regularly use this pose before I even roll out my yoga mat! In the mornings, while still in bed, it helps me release mild stiffness built up while sleeping. At nighttime, it helps me relax and fall asleep faster.

Final Remarks
Whether you’re looking to alleviate specific discomfort, expand your library of yoga poses, or deepen your mind-body-breath connection, I encourage you to try incorporating Wind-Relieving Pose into your next sequence.
With many benefits and few contraindications, this pose is accessible to nearly everyone. Remember, yoga is a personal journey; try different pose variations, listen to your body, and adjust as necessary for the most beneficial experience.
Practicing the wind-relieving pose is like giving a hug to your insides as you hug your knee into your chest. Show your body some love as you embrace this rejuvenating pose today.
Want more helpful info like this in your inbox once in a while? Join our email newsletter!
Pop quiz! 🧘🤔
Wind-Relieving Pose can release tension in the hips and low back.
Wind-Relieving Pose is an advanced asana and not suitable for beginners.
Breath awareness is a key component to practicing Wind-Relieving Pose effectively.
Frequently Asked Questions
What is the Sanskrit name for the wind-relieving pose?
The Sanskrit name for this stretch is Pavanamuktasana.
Are there modifications for the wind-relieving pose?
Yes, modifications include using a cushion or folded blanket for support under the head or neck, a strap to bring the knee toward the chest, or a slightly modified body position.
What are the key health benefits of practicing this pose?
Wind-relieving Pose relieves lower back pain, releases the hips, and relieves digestive discomfort.
What are the contraindications for Wind-Relieving Pose?
Women past their 2nd trimester of pregnancy, along with individuals with recent abdominal surgery, hernias, and severe spinal problems, should avoid this pose.
How should I use the wind-relieving pose in my yoga sequences?
You can pair this asana with other supine yoga poses or twisting postures targeting digestive health. Place it at the beginning of a sequence as a warm-up or toward the end as a transition into Savasana.