Joanne Highland is a 500-hour certified yoga and barre fitness teacher. Originally from the central coast of California, she attended the University of Southern California, graduating in 2007 with a degree in music and a minor in health promotion.Follow me:Instagram | LinkedIn | Personal Website
Jagpreet Kaur is a certified yoga instructor/therapist (Ministry of AYUSH, YCB, Govt. of India), nutritionist (from INFS), skilled marketing copywriter, and content writer. She is also an expert in pre-and postnatal care. Jagpreet seamlessly blends her knowledge of nutrition, yoga, and writing with a passion for spirituality that fuels her commitment to wellness, evident in her holistic approach and dedication to meditation.Follow me:Instagram | LinkedIn
Published Date:
Estimated reading time:
Locust Pose
Key Takeaway
Locust Pose (Salabhasana) is a versatile yoga posture that strengthens the back, improves posture, and alleviates lower back pain, making it an essential practice for counteracting sedentary lifestyles.
There are countless reasons why you may decide to begin a yoga practice. The physical benefits alone are numerous: toning muscles, building strength, improving mobility, reducing pain and stiffness, and the list goes on…
In this article, we’ll break down yoga’s Locust Pose (Salabhasana) — one of the most comprehensive yoga postures as it strengthens, lengthens, and so much more!
Locust Pose is a beginner-to-intermediate level back-bending pose done in a prone (face-down) position. Its Sanskrit name Salabhasana (pronounced: sha-la-BAHS-anna) comes from combining the words shalabh (grasshopper or locust) and asana (pose).
Locust pose strengthens and engages the whole body, and in turn bolsters mental fortitude. Many yoga teachers use Locust Pose as a warm up for deeper backbends like Bow and Wheel Pose, or as a counter pose to forward folding poses. In other cases, Locust might be a peak pose in your yoga practice — especially if your goal is to build back and abdominal strength.
If you’d like to see a video demonstration with audio instructions, check out this brief tutorial on how to do Locust Pose:
Benefits of Locust Pose (Salabhasana)
The main focus of Locust Pose is on spinal extension, technically categorizing this pose as a backbend. It strengthens the entire back body while lengthening the spine and entire front body. Here are some more amazing benefits of Locust Pose:
Opens the chest and expands the rib cage to promote deep breathing and reduce anxiety
Stimulates abdominal organs to aid digestion
Reduces abdominal pain from menstruation
Strengthens back muscles, glutes, hips, and abdominal muscles
Extends the spine, increasing blood flow and breath capacity to energize the body
Clearly, Salabhasana is wonderful for your entire body. But as you’ll see, this pose can work wonders for your back health and posture!
Improve Your Back Health with Locust Pose
The prevalence of low back pain is overwhelming, and increasing all the time due to changing lifestyle and work habits becoming more and more sedentary. Luckily, Locust Pose can help reverse the negative effects of too much sitting
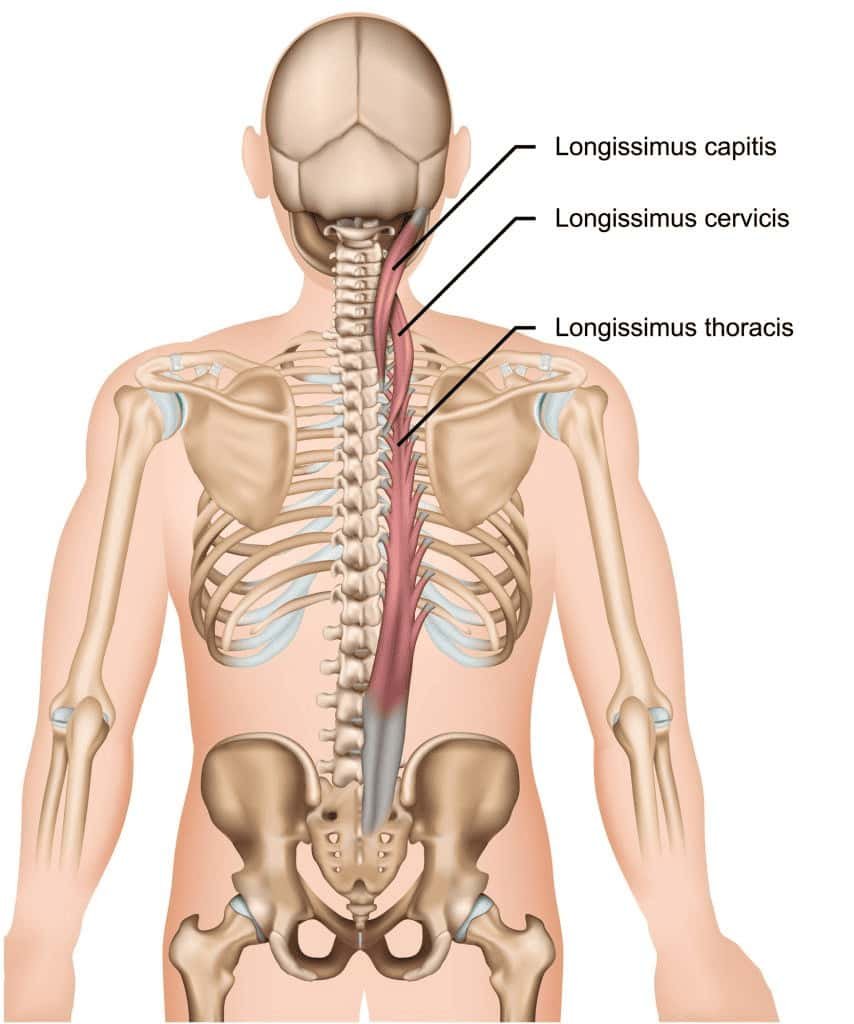
When we sit for long periods of time, the hips and hamstrings become shortened and gluteus muscles weaken. This inefficiency of the muscles in the lower body affect stability of the pelvic and lumbar region, and directly contribute to lower back pain. Salabhasana mitigates these issues by lengthening the hip flexors, while strengthening the hamstrings and glutes.
Of course, maintaining a strong back is vital to spinal mobility and posture. As you lengthen and lift your upper torso in Salabhasana, you engage all the muscles in your back, especially the longissimus muscle of the erector spinae muscle group. Salabhasana is one of the most powerful poses to target this area of the body. In fact, researchers found that yoga’s locust pose was effective in strengthening the lumbar muscles, which helped relieve lower back pain.
In the upper body, too much slouching causes rounding in the shoulders and upper back, sinking chest, and shortened muscles in front of the neck. As a heart-opening pose, Locust brings your body into the opposite position, with the chest open, shoulders stretching, and front of the neck long. If you spend hours a day at a desk, Salabhasana should absolutely be a part of your yoga practice.
How to Do Locust Pose (Salabhasana)
If you haven’t already been regularly practicing this rewarding asana, now is the time to start! Your back (and whole body) will thank you. Learn the correct alignment for Locust Pose with these step by step instructions.
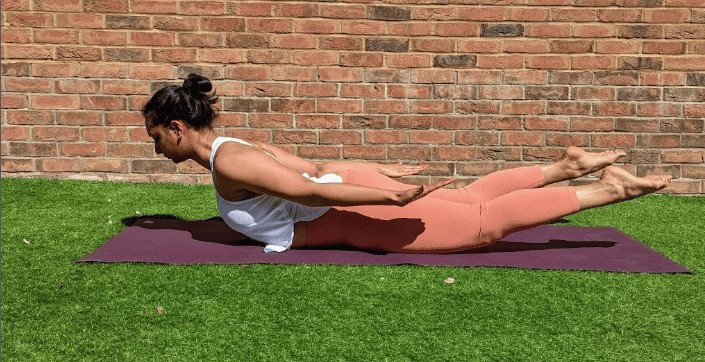
Begin lying in a prone position (belly-down), legs extended and separated at a hip-width distance, with the tops of your feet on the floor.
Bring your forehead and chin to your mat, so that your head is aligned with the top of your spine. Place your arms alongside your body, palms facing down.
Pull your navel in and up towards your spine, to engage your deepest core muscles.
With an inhale, simultaneously lift your head, chest, shoulders, arms, and legs.
Draw your shoulder blades together as you continue to extend your arms back. Keep reaching through each finger tip and feel your chest open.
Activate your leg muscles: pull up on your kneecaps, feet pressing into the floor. Then, squeeze your glutes and lift your legs off the ground.
Keep your legs straight and reach them back as you lift. Point your toes and use the muscles of your inner thighs to squeeze your legs together, trying to bring your big toes to touch.
Keep your gaze down and slightly forward, with the back of the neck long.
Keep your chest lifted and hold your Locust Pose for a three to five breaths. With each inhale, try to lift your upper and lower body a centimeter higher.
When you are ready, slowly release your body back down to your mat, and let your entire body relax as you turn your head to the side and place your cheek on the floor. Your arms can rest gently at your sides, palms facing up.
To really experience all the amazing effects of Locust Pose, repeat the pose twice more. This will help you build strength and mobility in your spine and help prevent low back pain. If you’d like, try one of the variations below with each repetition of Salabhasana.
Contraindications
While there are many modifications for Locust Pose, there are certain cases in which it’s best to skip Salabhasana.
Since Locust Pose puts pressure on the abdominal organs, you should avoid Locust Pose if: you are in the second or third trimester of pregnancy, have had recent abdominal surgery, or suffer from a hernia.
Similarly, if you have high blood pressure, regular migraines or other headaches, you should skip poses like Locust in which the head is inverted (in the grounded version) or the back of the neck might become constricted.
Lastly if you’ve experienced a recent neck injury, shoulder injury, or slipped disc, it’s advisable to wait to try Locust Pose until you’re in top health.
Locust Pose Modifications
One aspect of Salabhasana that makes it such a great pose is how you can change the experience of the posture with simple variations that emphasize different areas of the body. If you are still working on building your strength, of course there are always yoga prop modifications to make Locust Pose accessible to you no matter where you are in your yoga practice!
Modify Your Body Position
Hands on floor: this gentle variation is ideal if you’ve had a past shoulder injury. Set yourself up the same way as regular Locust Pose.
With an inhale, lift your upper body and your legs while keeping your palms pressing into the floor. Your chest and shoulders will not come up off the floor as much, but you can still concentrate on lengthening through your spine by reaching the crown of your head forward and slightly up, keeping the back of the neck long.
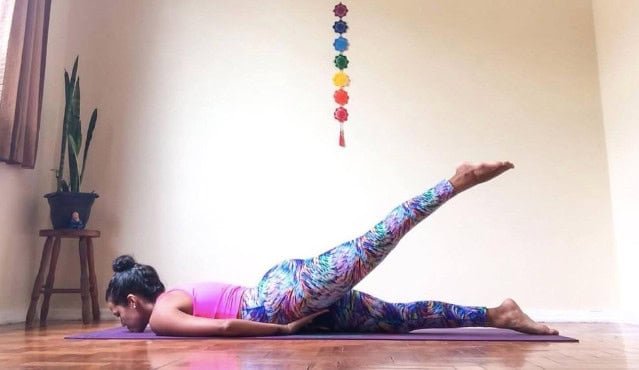
Half Locust: lifting only one leg at a time is helpful for building strength in your back body and legs. You can also try this one-leg version of Locust as a way to warm up to the full pose.
Begin in the same way as regular Locust Pose. As you lift your upper torso, lift your left leg while keeping your right leg pressing into the floor. You might choose to keep your palms grounded as well, or hover your arms a few inches off the ground. Hold your Half Locust for a few breaths, then release gently back down to your mat. Repeat on the other side, lifting your right leg.
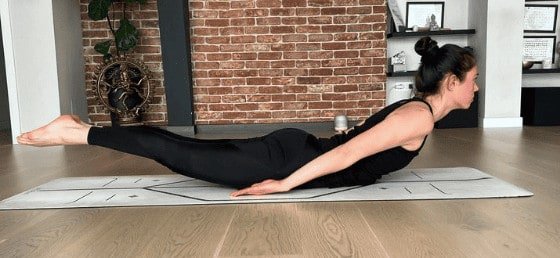
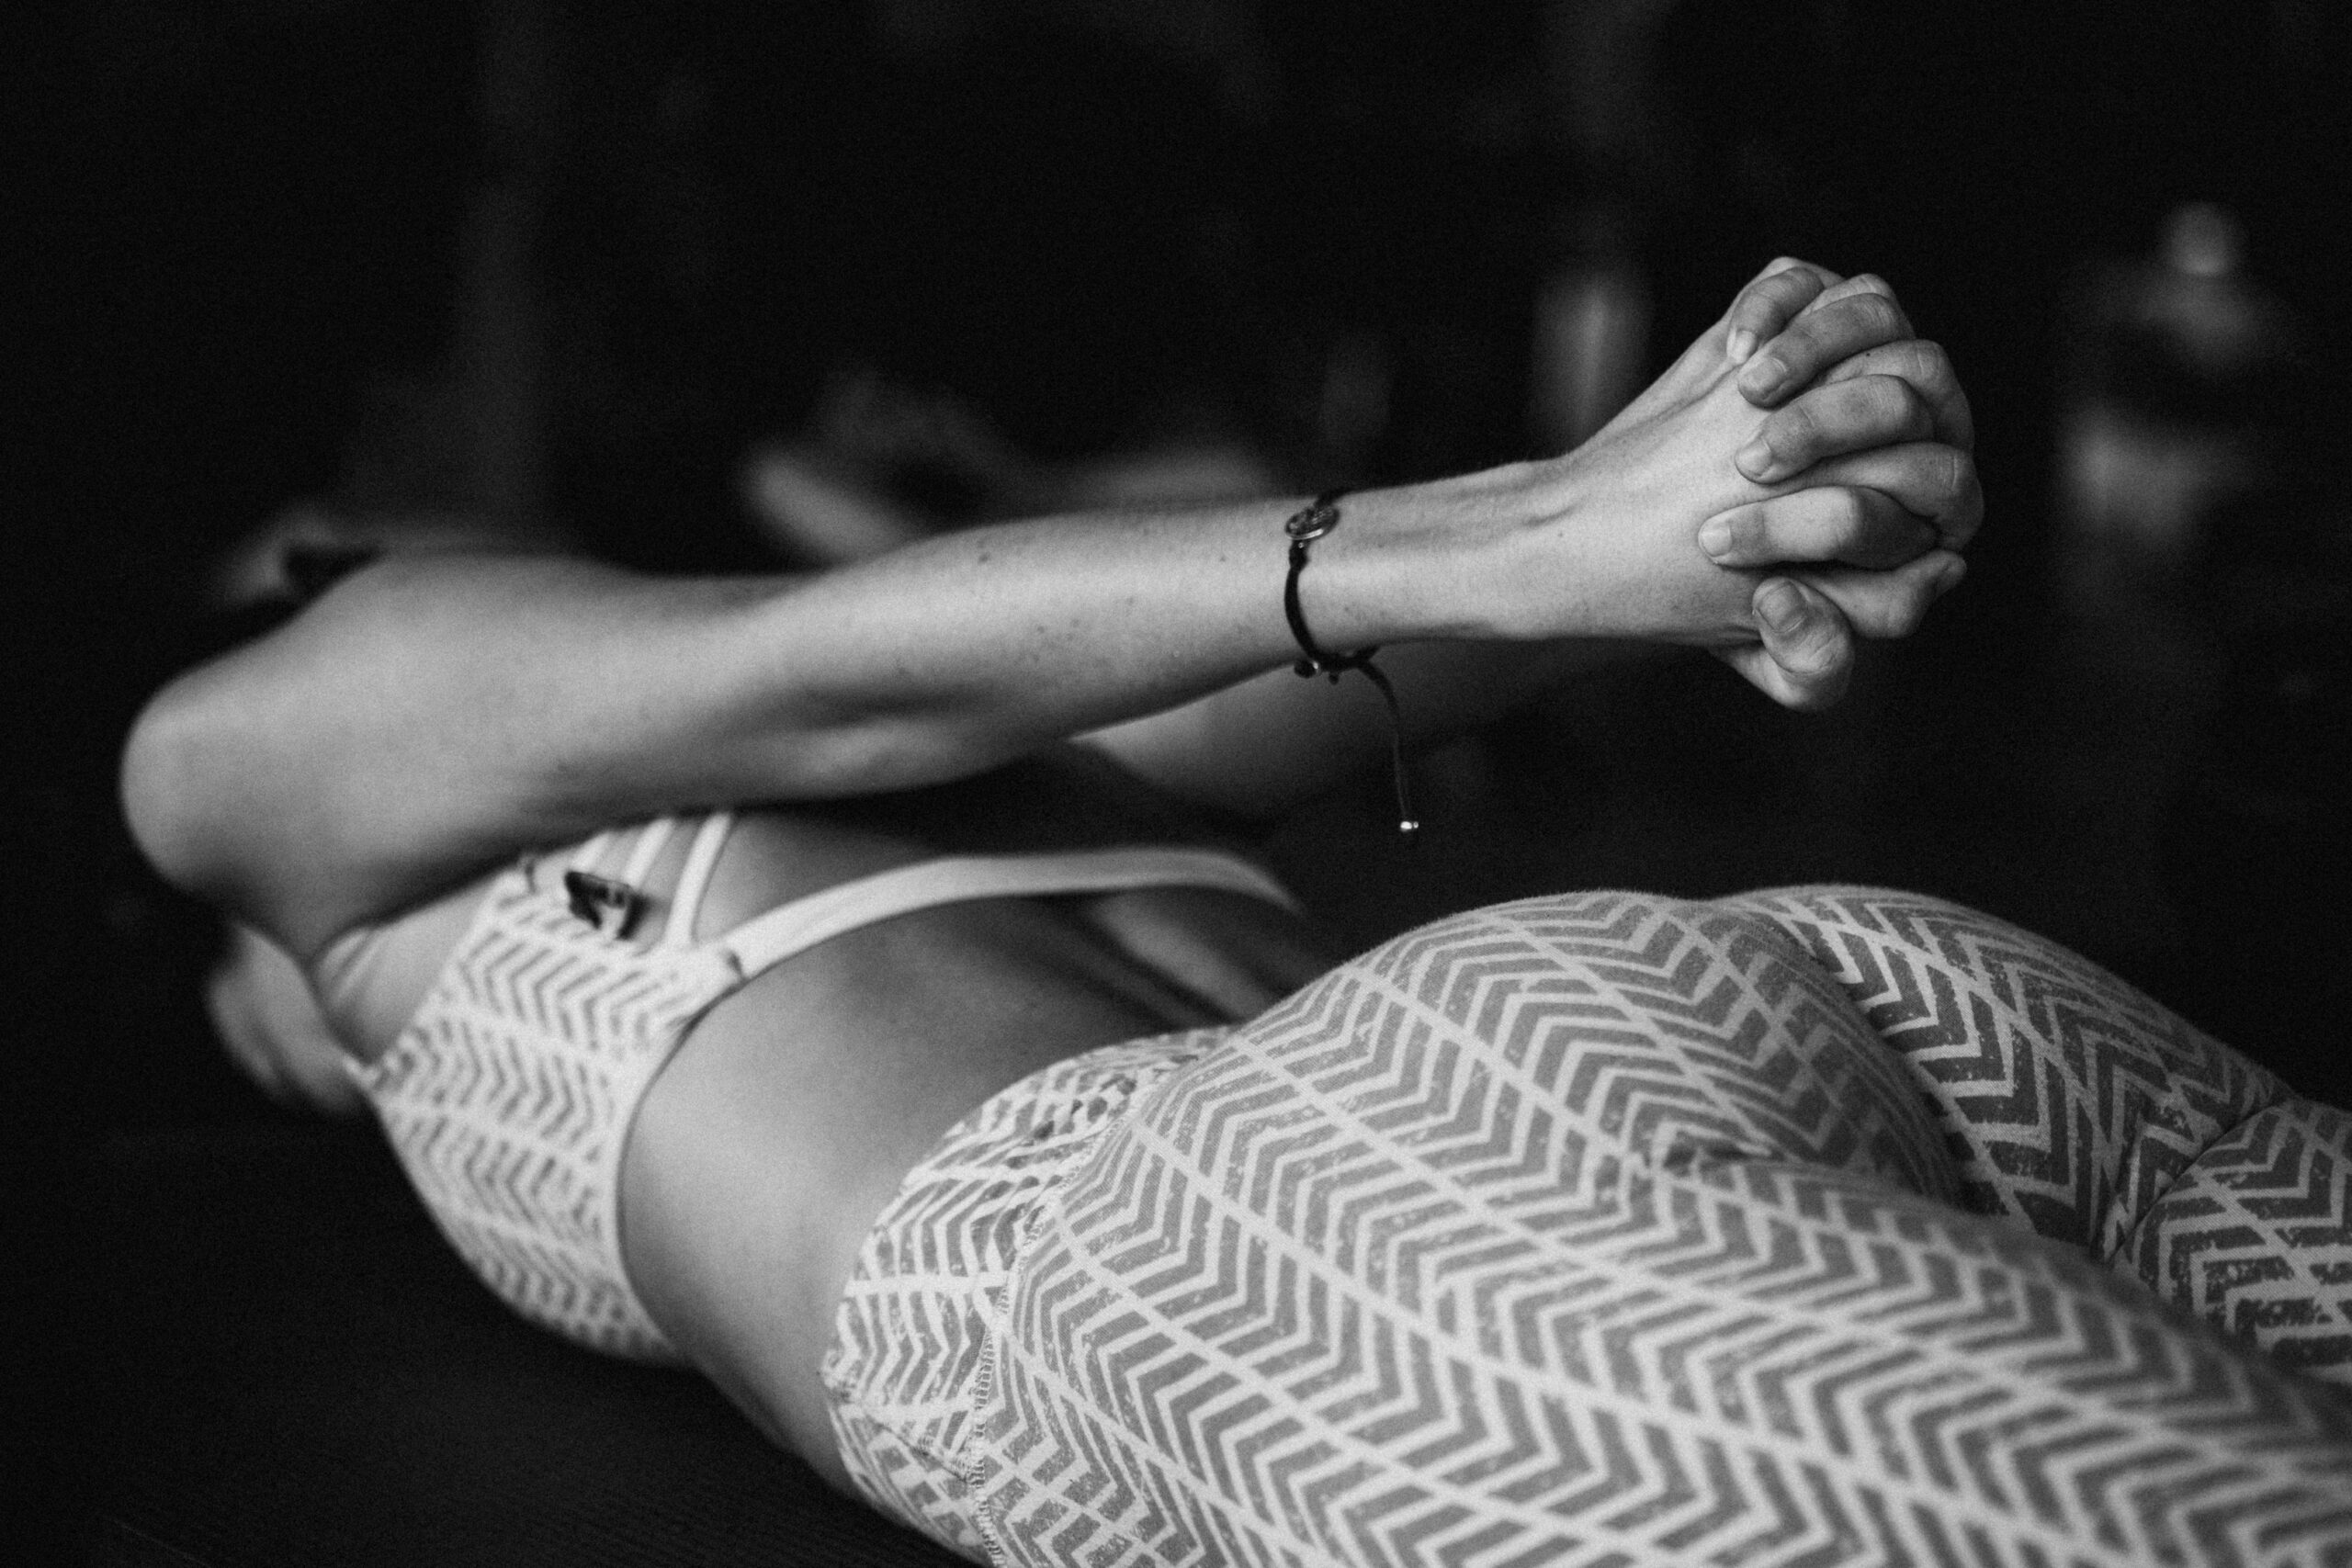
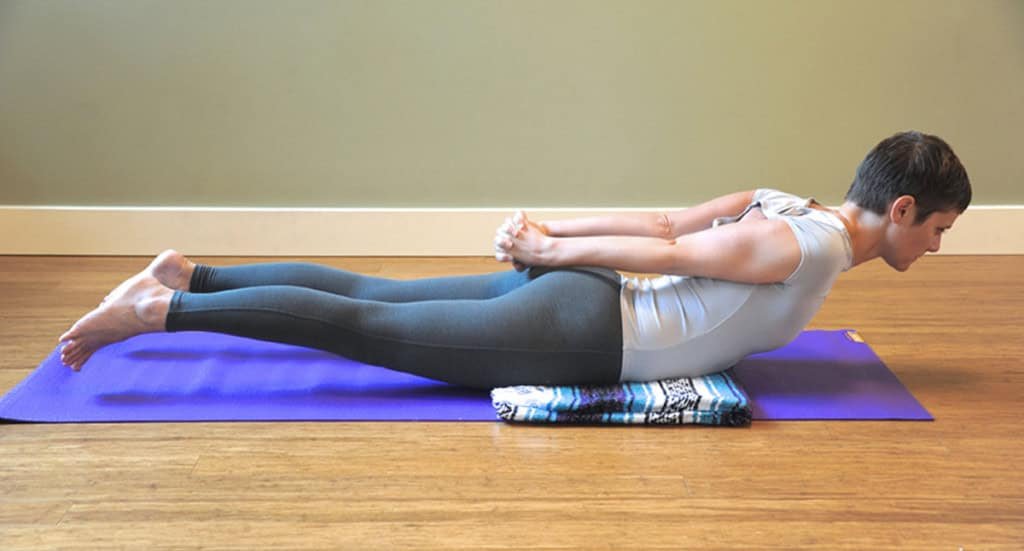
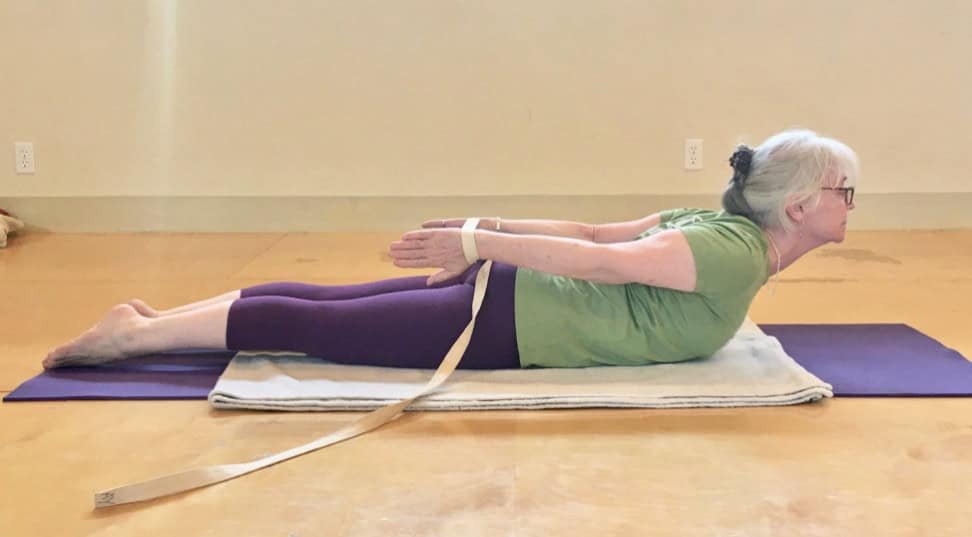
Bound Locust Pose: if your upper body is especially tight or you’ve been sitting for a while, try adding this extra shoulder and chest opener.
Begin in the same prone position as listed above, and reach your arms behind your back. Interlace your fingers, creating one fist. Inhale to lift your head, chest, shoulders, and legs. Squeeze your shoulder blades together and reach your arms straight back. Feel your chest expand tiny bit more with each breath. When you’re ready, release your hands and lower yourself back down to your mat, resting in Belly Savasana.
Modifications with Props
Block: Place a yoga block underneath your forehead to reduce strain on the neck. This modification is also a great way to check your alignment, as it prevents you from crunching your neck back in order to lift the head.
Folded blanket: Locust Pose requires you to balance your weight in your pelvic region, which might feel uncomfortable for your hip bones. Place a folded blanket under your hips and pelvis for extra cushion.
Rolled blanket: If you’re having difficulty lifting your chest, set yourself up with a rolled blanket under your rib cage to focus on working your upper back muscles. With practice, you will build enough strength in your back body to lift your whole upper torso on its own.
Strap: Want to try Bound Locust, but your shoulders are just too tight? Grab a strap and stretch it across your lower back. Bring your hands as close together as possible, then lift up into Bound Locust (as described above), holding onto the strap with your arms straight and reaching back.
Advanced Variations of Locust Pose
Looking to level up your Locust Pose? Try these advanced variations of Salabhasana to deepen your experience in the pose. These challenging variations will not only make you physically stronger, but will increase your mental fortitude as well.
Grounded Locust Pose
Various yoga teachers this specific variation of Salabhasana, in which you keep your arms and hands underneath your body, and your upper torso stays grounded. This version is challenging as the aim is to lift the legs higher than in traditional Locust, requiring more leg, hip, and low back strength.
Additionally, placing your hands underneath yourself creates intense external rotation of the arms and will test rotational range of motion in the wrists.
To try this grounded version of Locust:
Lie face down on your mat, legs straight and tops of the feet on the floor. Bring your arms to your sides, palms facing down.
Lift your hips and slide your hands and arms underneath yourself. Bring your pinky fingers to touch so that your hands are under your pelvis.
Press your forehead and mouth into your yoga mat.
Engage the muscles of your legs to lift them off the floor, aiming for about a 45-degree angle. Squeeze your inner thighs and try to bring your big toes to touch.
Keep your breath flowing and hold Locust Pose for a few breaths. Then, lower your legs back down and rock your hips side to side to release your arms and rest in belly Savasana.
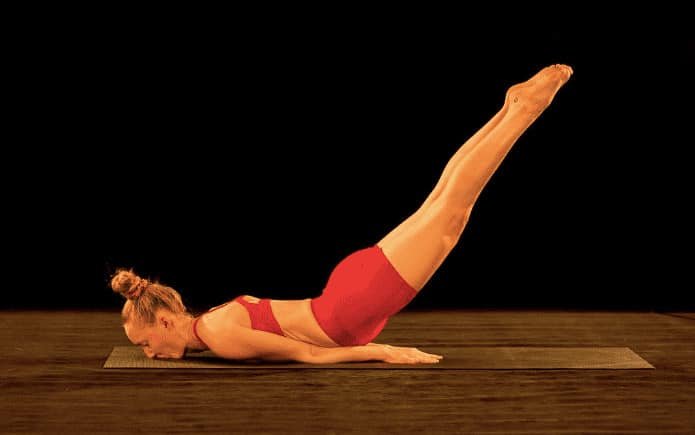
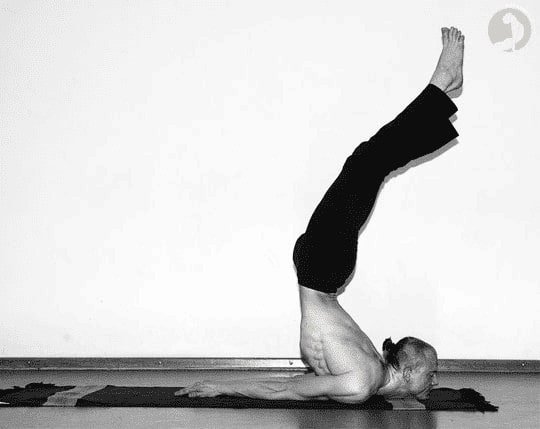
Inverted Locust Pose
As the name indicates, this version of Salabhasana inverts the entire body, with the extending the legs skyward while the arms, shoulders, chest, and head stay grounded to the floor. This variation of Locust Pose is included in the Ashtanga advanced series of yoga postures. Compared to Grounded Locust, the body is in a more vertical position; the back body is curved slightly, with the feet aligned over the shoulders.
This most advanced expression of Salabhasana demands even more core and leg strength in order to raise your lower body off the flor. Once you are in the posture, the back muscles must work to stabilize your spine and hold the vertical position of your body.
Begin as you do in traditional Locust, lying face down. Extend your arms back with your palms facing down.
Look forward, with your chin resting on the floor. Press down firmly through your arms and palms.
Pull the low belly in and up to engage your abdominal muscles. Squeeze your glutes and pull up on the kneecaps so the leg muscles are engaged.
Float your legs up off the floor. Use your core strength along with the resistance of your arms pressing into the floor to raise your legs straight up into the air.
Create a slight curve in your back body, bringing your feet forward over your shoulders. Try to keep your legs straight. Hold your Inverted Locust for three to five breaths.
Use the same mindful core engagement to lower your legs back down to your mat with control, and let your body rest.
To see how this impressive pose is done, check out this short video:
As with any backbend, proper warm-up and alignment are imperative to ensure you avoid any potential injury. These suggested preparatory poses will help you do exactly that!
Mountain Pose with Shoulder Opener
You might consider this a standing version of Locust Pose, as your upper body is opening in the same way. Practicing this standing chest and opener will help you achieve correct alignment in your Salabhasana.
Stand with your feet at about hip width distance and your arms at your sides, palms forward.
Grow tall through the crown of your head, lengthening your spine.
Bring your hands behind your back and interlace your fingers to make one fist.
As you breath in, straighten your arms as much as you can, drawing your one fist toward the floor.
Squeeze your shoulder blades together to open across your chest. Lift your chin an inch or two but maintain length in the back of the neck.
Breathe deeply and feel your upper body expand with each breath. Hold for five or so breaths, then release your hands and return your spine to a neutral position, standing tall in Mountain Pose.
Cat and Cow Pose
Cat and Cow is a great way to warm up your back muscles and bring your awareness to your spine. Follow our pose guide for Cat and Cow!
Cobra Pose
Cobra Pose targets the same upper back muscles as Locust, while using your arms to supper the weight of your upper body. It also uses the glutes an hamstrings to a lesser degree, since your legs remain on the floor in Cobra. This makes it a fantastic way to warm up for Salabhasana!
For more details and step by step instructions, check our our Cobra Pose guide!
Follow-up Poses
After you practice Locust Pose, there are many options of how to continue your yoga flow. You might be ready to relax if Salabhasana was your peak pose. On the other hand, you might be feeling inspired to continue with some more heart-opening poses. Either way, here are some other poses you can try after Locust Pose.
Bow Pose
Once your back body is warmed up with Locust Pose, you’ll be ready to try some deeper backbends! Of course, you can change your orientation to an upward-facing posture like Bridge or Wheel; however, Bow Pose follows seamlessly after Locust in a yoga flow, as they are both prone (belly-down) back-bending yoga postures.
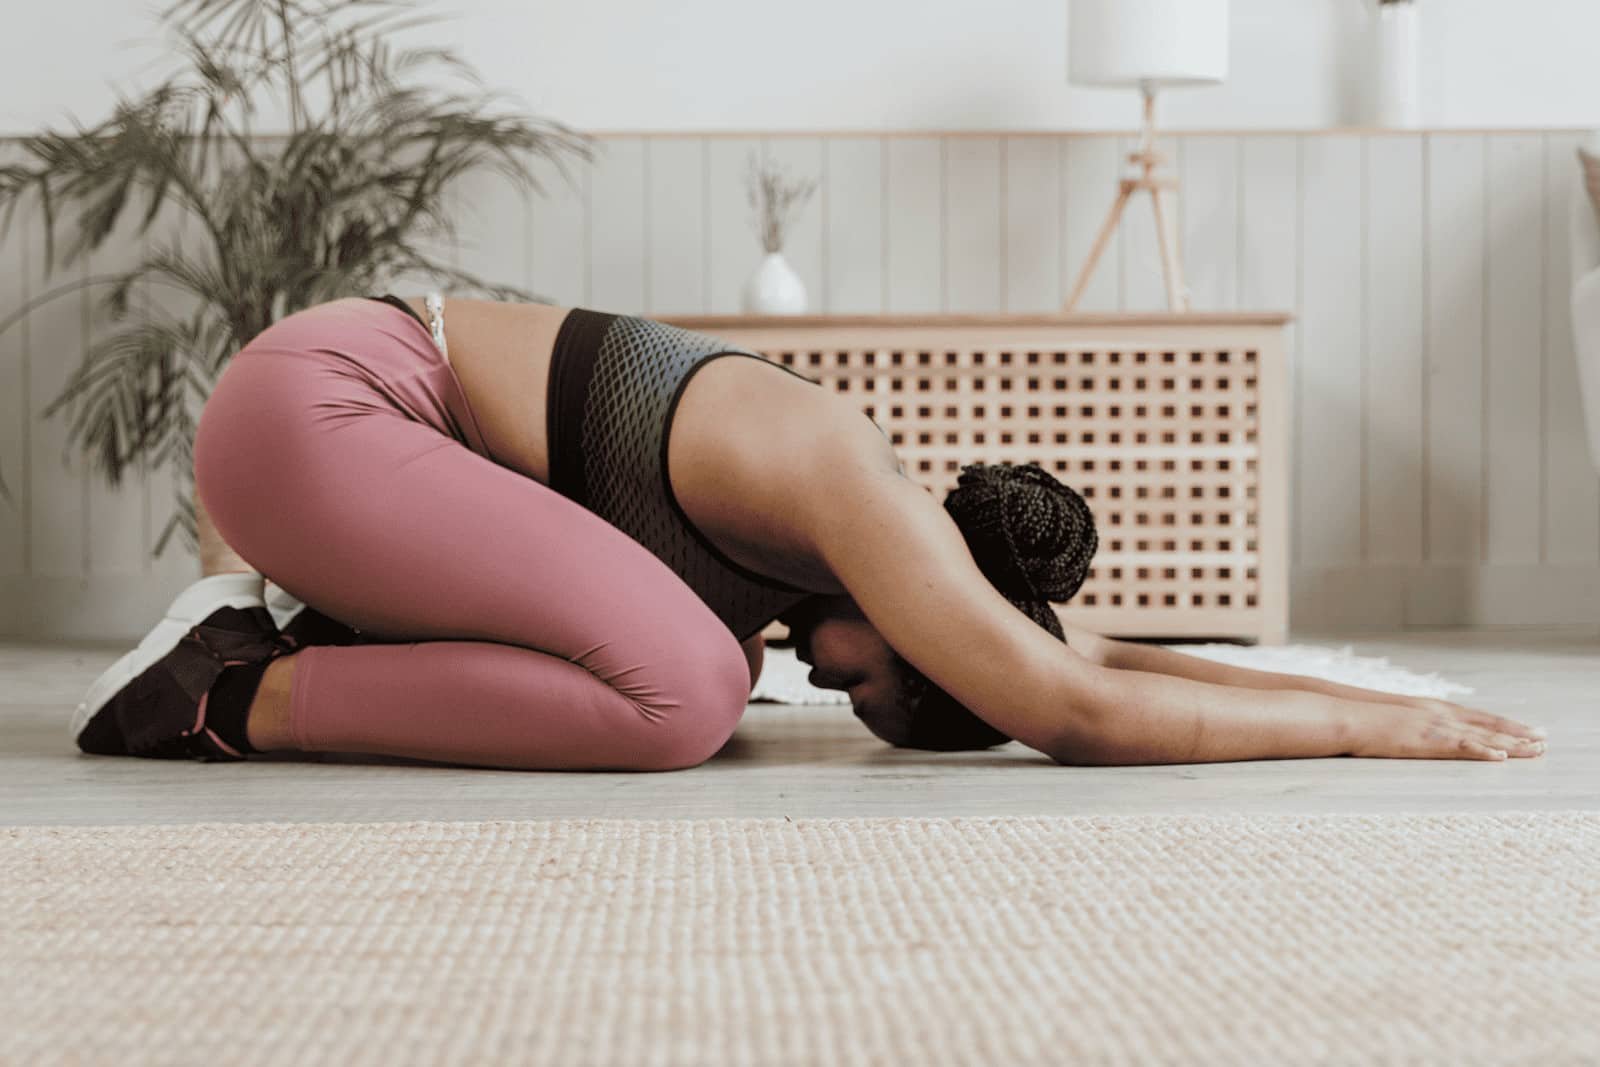
After doing a pose where spinal extension is the focus, it feels really soothing to stretch your back muscles and spine. Child’s Pose is the ultimate counter-pose for many postures.
If you need more information, we’ve broken it down for you in a complete guide to Balasana!
Reclined Spinal Twist
Another way to help your entire back relax after an intense strength-based pose like Locust is with a twist. Try this supine (reclined) Spinal Twist stretch at the end of your practice or directly after Locust Pose.
Lie on your back with your legs extended and arms at your sides.
Bend your right leg and bring your right knee in towards your chest.
On your exhale, take your right knee across your body, twisting your spine. Open your right arm to the side.
Hold your twist for 30-60 seconds, then gently return to your back and release your right leg down.
Rest in your Savasana for a couple breaths, then repeat your twist to the other side, bringing your left leg in and across your body.
Common Questions about Locust Pose
How long should I hold Locust Pose?
Aim for three to five breaths to begin with, and work your way up to one minute. Try to repeat three rounds of the pose to build up strength and stamina.
How often should I practice Salabhasana?
In order to avoid or improve lower back pain and reduce the negative effects of sitting, practice Locust Pose regularly u002du002d at least a few times per week is ideal.
Why is it called Locust Pose?
The shape of the body, with arms and legs extended hovering off the ground, is thought to look like a grasshopper or locust in flight.
What is the main purpose of Locust?
Though this posture brings many positive effects, the main focus should be on spinal extension and back body strength. In that sense, it will not only improve your back health and posture, but is helpful in progressing to more advanced backbends.


 3")


 6")

 8")

