Joanne Highland is a 500-hour certified yoga and barre fitness teacher. Originally from the central coast of California, she attended the University of Southern California, graduating in 2007 with a degree in music and a minor in health promotion.Follow me:Instagram | LinkedIn | Personal Website
Jagpreet Kaur is a certified yoga instructor/therapist (Ministry of AYUSH, YCB, Govt. of India), nutritionist (from INFS), skilled marketing copywriter, and content writer. She is also an expert in pre-and postnatal care. Jagpreet seamlessly blends her knowledge of nutrition, yoga, and writing with a passion for spirituality that fuels her commitment to wellness, evident in her holistic approach and dedication to meditation.Follow me:Instagram | LinkedIn
Published Date:
Estimated reading time:
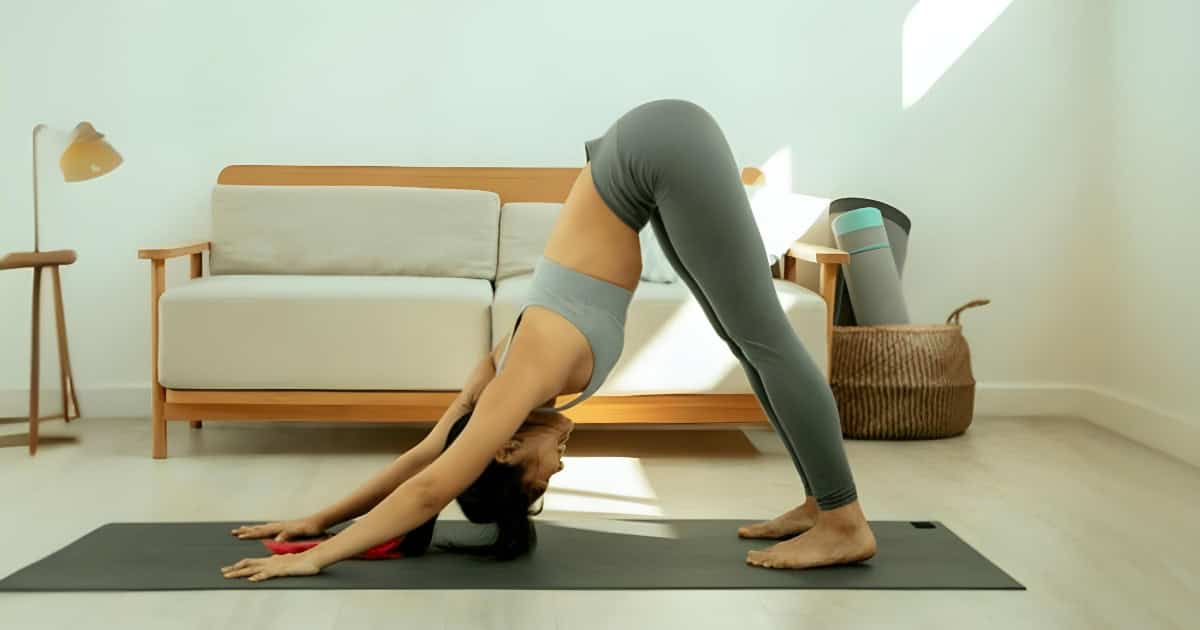
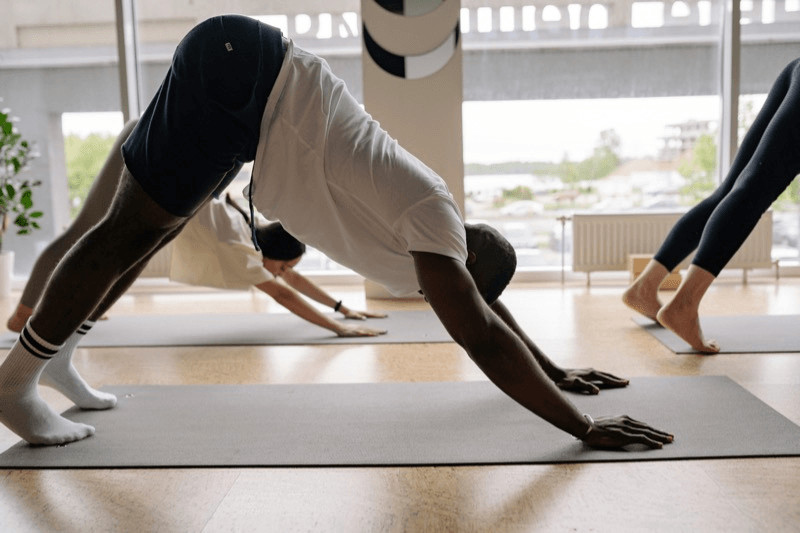
Downward Facing Dog Pose
Listen to this article:
Key Takeaway
Downward Facing Dog, or Adho Mukha Svanasana, is an essential pose for every yogi to know. Being aware of key alignment points and avoiding common mistakes is crucial for practicing this pose effectively. Incorporate this foundational pose into your yoga routine thoughtfully, using sequencing tips to create a balanced practice that suits your individual needs.
DOWNWARD FACING DOG
Alternate name:
Adho Mukha Svanasana
Difficulty level:
Beginner
Pose category:
Inversion
Arm support (arms)
Forward bend (torso)
Stretch (hamstrings, calves, arches)
Strengthens (arms, shoulders)
Muscle groups:
Shoulders (Upper Body)
Arms (Upper Body)
Hamstrings (Legs)
Calves (Legs)
Arches of the feet (Feet)
Spine (Back)
Core muscles (Torso)
Physical benefits:
Strengthens arms and shoulders; stretches hamstrings, calves, arches.
Therapeutic applications:
Relieves back pain by decompressing the spine, improves flexibility in hamstrings and calves.
Based on the information provided in the blog post, Downward Facing Dog (Adho Mukha Svanasana) is not specifically associated with any particular chakra. The post does not mention chakras in relation to this pose. Therefore, I cannot provide a list of related chakras for Downward Facing Dog based on the content of the blog post.
Most helpful prop:
Yoga blocks under hands - helps align spine, reduces strain.
If you’re a beginner to yoga and feeling intimidated by stepping into a class full of experienced yogis, one of the best things you can do to prepare is learn a few basic postures before you go.
Downward Facing Dog, or Adho Mukha Svanasana, is a cornerstone in Hatha and Vinyasa classes and an asana you’ll return to again and again in your practice. It’s also one of the most well-known and popular yoga poses.
However, as one of yoga’s most recognizable poses, I find it one of the most misunderstood. For example, have you ever heard a teacher refer to Downward Dog as a “resting” posture? In practice, this pose actually requires a considerable amount of strength and flexibility, as you’ll discover in this comprehensive guide.
Let’s unravel the intricacies of this iconic pose together. I’ll shed light on the true intentions of this asana as I guide you through step-by-step instructions and expert alignment tips that will help you transform your practice.
Time Left:
00
:
00
:
00
HRS
MIN
SEC
Time Spent: %%TIMESPENT%%
Time expired. Sorry, you will not be able to continue with this quiz. Please opt-in to see the result.
SEC
HRS
MIN
SEC
SEC
Total Time
[SQBTimeSpent]
0
HRS
0
MIN
0
SEC
The thing I'm most interested to learn about Downward Facing Dog is:
Where can we email you the results? Please enter details below.
In this comprehensive pose guide, I'll tell you all about Downward Facing Dog! Keep reading to learn about its significance, Sanskrit name, detailed practice instructions, alignment cues, and sequencing tips.
Lorem Ipsum is simply dummy text of the printing and typesetting industry. Lorem Ipsum has been the industry's standard dummy text ever since the 1500s.
Continue
%%CATEGORY_TOTAL_PERCENT%%
%%CATEGORY_TOTAL_NUMBER%%
[CATEGORY_TOTAL_PERCENT]
[CATEGORY_ONLY_PERCENT]
[CATEGORY_TOTAL_NUMBER]
This article gives a thorough explanation of Downward Facing Dog, so keep reading to see if your question gets answered. If not, leave us a comment below -- we're here to help!
Lorem Ipsum is simply dummy text of the printing and typesetting industry. Lorem Ipsum has been the industry's standard dummy text ever since the 1500s.
Continue
%%CATEGORY_TOTAL_PERCENT%%
%%CATEGORY_TOTAL_NUMBER%%
[CATEGORY_TOTAL_PERCENT]
[CATEGORY_ONLY_PERCENT]
[CATEGORY_TOTAL_NUMBER]
First, read this detailed guide to familiarize yourself with the Downward Facing Dog position. Then, head over to our article explaining the Sun Salutation sequence.
Lorem Ipsum is simply dummy text of the printing and typesetting industry. Lorem Ipsum has been the industry's standard dummy text ever since the 1500s.
In this comprehensive pose guide, I'll tell you all about Downward Facing Dog! Keep reading to learn about its significance, Sanskrit name, detailed practice instructions, alignment cues, and sequencing tips.
Lorem Ipsum is simply dummy text of the printing and typesetting industry. Lorem Ipsum has been the industry's standard dummy text ever since the 1500s.
%%CATEGORY_TOTAL_PERCENT%%
%%CATEGORY_TOTAL_NUMBER%%
[CATEGORY_TOTAL_PERCENT]
[CATEGORY_ONLY_PERCENT]
[CATEGORY_TOTAL_NUMBER]
Retake
YOUR TOTAL POINTS
0
Watch our recommended steps for entering, holding, and exiting the pose:
Downward Facing Dog Meaning and Evolution
In modern yoga, Downward Facing Dog holds great importance. You’ll likely spend much time in this asana when you start taking yoga classes regularly. So, let’s get familiar with it.
Sanskrit Name Breakdown
Some yoga teachers may call this pose by its Sanskrit name, Adho Mukha Svanasana. It might sound like a mouthful, but it is easier to remember when you understand the meaning of each word.
Adho comes from the root word adhas, meaning “down.”
Mukha translates to face.
Svana means dog.
When put together with the suffix “asana” or “pose,” they describe the body’s position as resembling a dog stretching with its head down.
Pose Evolution
Due to its popularity, you might assume that this pose holds ancient roots in yoga. As it turns out, Downward Facing Dog became popular in the 20th century with the spread of Hatha yoga and its various branches of Vinyasa and Ashtanga.
T. Krishnamacharya, the so-called “father of modern yoga,” demonstrated this asana in his 1934 text Yoga Makaranda. His student-turned-yoga teachers, K. Pattabhi Jois and B.K.S. Iyengar brought Downward Dog into prominence in Western culture throughout the 20th century.
Many first encounter Downward Facing Dog when learning the Sun Salutation sequence, but it doesn’t always have to be part of a dynamic flow. Hatha teachers often include it in stretching-focused classes, holding the pose statically for several breaths.
Step-by-Step Guide to the Pose
Before adding Downward Facing Dog to your yoga sequences, familiarize yourself with its alignment by following these steps.
Starting Position
Begin on your hands and knees in Table Top Pose. Spread your fingers wide with your index fingers pointing straight ahead or slightly turned out. Press firmly through your palms and knuckles.
Move into Position
From all fours, tuck your toes under and lift your hips high. Your body should form an inverted “V” shape. Straighten your legs gradually as you press your heels toward the floor.
Alignment tip: Keep a slight bend in your knees if needed. This pose is not about how straight your legs are but about lifting through the hips to create length in the spine.
Ground down evenly through both feet. It might feel good to pedal out one leg at a time to warm up into this stretch. I often raise and lower my heels a couple of times when I first arrive in this position to open up the backs of my legs.
Upper Body Techniques
Many people feel a deep stretch in their hamstrings in this position, but don’t forget about your upper body!
Press the floor away firmly with your arms straight and avoid scrunching your shoulders around your ears. Spread your shoulder blades wide across your upper back rather than squeezing them together.
Breathe with Intention
While holding your Downward Dog, use your breath to help deepen the stretch. For example, when you inhale, think about reaching your tailbone up and back. As you exhale, press your chest and belly toward your thighs while maintaining length in your spine.
Maintain Focus
Keep your ears aligned between your upper arms while gazing towards your navel or thighs, which aids balance and concentration throughout this pose.
Engage your entire body by actively pressing the floor away from you while reaching your hips toward the ceiling.
Mindful Release
After holding Adho Mukha Svanasna for several breaths, bend your knees and place them gently on your mat, returning to Table Top Pose. Then, press your hips back to sit on your heels to give your arms and shoulders a rest in Child’s Pose.
Modifications and Variations for Beginners
Remember that every individual body is unique, with different abilities and varying proportions. Experimenting with props and modifications is essential to find a version of Downward Dog that works for you.
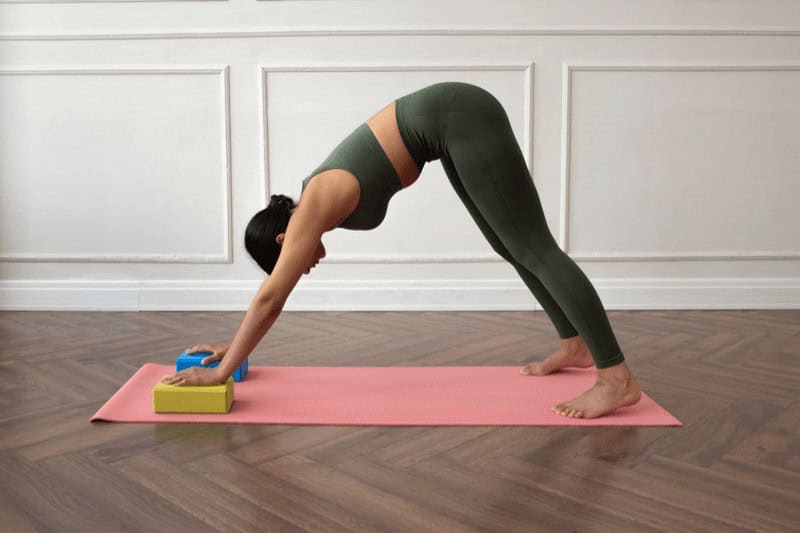
Prop Support
Using props can make Downward Facing Dog more accessible. Here are some ideas I encourage you to try.
Blocks: For people with shorter arms, place your hands on yoga blocks to bring the floor closer to you.
Blanket: If you cannot place your feet flat on the floor, you may set a folded blanket underneath your heels.
Wall Support: Stand a little farther than arm’s length from a wall. Place your palms on the wall as you hinge forward from your hips, keeping your arms straight.
I find that my students gain confidence when they use props. Trying a variation like Wall Dog is also helpful in feeling the proper spinal alignment without needing so much upper body strength.
Key Alignment Points and Common Misalignments
Safety Markers
In Downward Facing Dog, proper alignment is crucial. It ensures safety and maximizes the stretch’s benefits. One key marker is a straight spine. Imagine creating one long line from your tailbone to the top of your head.
Another point involves core engagement. Activating your core helps you maintain a stable and aligned position. A strong and engaged core provides a solid foundation for the upper and lower body, allowing you to distribute weight evenly and prevent excessive strain on the shoulders, wrists, and lower back.
Misalignment Fixes
Misalignments can hinder progress in yoga practice. Here are some of the most common mistakes I see in Downward Facing Dog, along with how to fix them.
Shoulders creeping up toward the ears. To correct this, press down firmly through your hands and rotate your upper arms outward to broaden the shoulders.
Compressing the neck. This happens when you look forward between your hands. Instead, look toward your thighs to align your head with your spine.
Rounding the lower back. If you have tight hamstrings, your lower back may round when you straighten your legs. Instead, keep your knees bent and heels slightly lifted to maintain length in your spine. Or, try stepping your feet back a bit to lengthen your stance.
Adho Mukha Svanasana Benefits and Contraindications
Physical Gains
Practicing Downward Facing Dog offers numerous physical benefits. This pose stretches and strengthens various body parts, including the shoulders, legs, and spine. It can improve flexibility, especially in the hamstrings and calves.
Strengthens arms and shoulders
Stretches hamstrings, calves, arches
Relieves back pain by decompressing the spine
This pose can work wonders for people like me who spend several hours a day seated at a desk. It lengthens the whole back side of the body, helping me release tension built up throughout the day.
As an inversion, Downward Dog also promotes blood flow to the brain. This can help boost concentration and calm the mind. The focus and body awareness required to hold the pose aids in mindfulness off the mat as well.
Mindful Cautions
In some instances, Downward Facing Dog can pose risks. Individuals with wrist or shoulder injuries might find that Downward Dog aggravates these areas due to the weight-bearing nature of the asana.
It’s also crucial for individuals with certain back conditions like herniated discs to proceed carefully or avoid this stretch altogether unless cleared by a healthcare provider.
Wrist Relief
If students experience wrist pain in this asana, I suggest Dolphin Pose as an alternative. Instead of placing your hands on the floor, bend your elbows and come down to your forearms.
This variation was beneficial to me when I was recovering from wrist surgery. It allowed me to keep practicing some of my favorite yoga sequences as I gradually built back strength.
Integrating the Pose into Your Yoga Routine
Sequence Timing
Downward Facing Dog is a versatile pose often used in yoga sequences. It’s common to see this posture in Sun Salutations, where it helps transition between poses.
When I use Adho Mukha Svanasana in a flow, I like to stay in the pose anywhere from 1 to 3 breaths before moving on to the next pose. This gives me a moment to check in with my alignment and focus on my breath.
It’s not truly a resting position, despite what some may think. Instead, it engages the whole body and requires attention to form. When planning your routine, consider placing Downward Facing Dog before or after poses that stretch similar muscle groups.
Complementary Asanas
Once you’re familiar with the essentials of Adho Mukha Svanasana, get creative with building your own yoga sequences. Here are some yoga poses I regularly use as a complement to Adho Mukha Svanasana:
Puppy Pose: Stretches the spine and releases the shoulders. Lower your knees down to Table Top and walk your hands forward, bringing your forehead down to your mat.
Plank Pose: Builds strong core connection. I like to warm up by flowing from Downward Facing Dog into Plank as I inhale and pressing back as I exhale.
Child’s Pose: After using your back, shoulders, and arms in Downward Facing Dog, give them all a rest with a few breaths in Child’s Pose. Lower your knees to the floor, press your hips back to sit on your heels, and rest your forehead on your mat.
Incorporating these asanas creates a balanced sequence that works the entire body.
In Transition
Using Downward Facing Dog as a transition is effective for maintaining the flow of vinyasa practices. In my classes, I prefer to use this asana when shifting from standing poses back down to the mat (or vice versa).
Standing poses to the floor: Fold forward, plant your hands, and step both feet back to Downward Facing Dog. Then, lower your knees down gently.
From Adho Mukha Svanasana, there are many creative ways to move into standing poses. For example, lift your right leg, step it forward between your hands, and rise into a lunge. Then, step your back foot forward into Chair Pose and rise to stand.
By integrating this foundational asana thoughtfully throughout your yoga routine — whether as part of Sun Salutations or paired with complementary postures — you achieve a smooth flow, turning your practice into a moving meditation.
Sequencing Tips for a Balanced Practice
Warm-Up Phase
Starting your yoga sequence with Downward Facing Dog aids in warming up your whole body. This pose stretches multiple muscle groups simultaneously. It prepares the legs, arms, and spine for more intense poses later.
In my experience, beginning with this pose helps to release any tension I have from sleeping or sitting too long. It sets a solid foundation for my practice.
Counterpose Function
After backbends or forward folds, Downward Facing Dog serves as an excellent counterpose. It allows the spine to lengthen and neutralize. This is crucial in preventing injury and ensuring your muscles recover appropriately between sequences. Think of it like hitting a reset button for your posture.
Closing Thoughts
As with all yoga poses, Downward Facing Dog is a practice of self-discovery — an opportunity for both body and mind to move together and align on the mat. It offers a foundation for strength, flexibility, and mindfulness.
Aside from that, Adho Mukha Svanasana is a favorite for many yoga teachers, as it is a versatile pose that can be seamlessly integrated into various yoga sequences.
I encourage all students, from beginners to advanced yogis, to embrace the process, be patient with yourself, and explore the empowering possibilities that Downward Facing Dog holds for your practice. Keep coming back to the mat, and allow this pose to be a guiding light on your yoga journey.
Ready to start flowing? Sign up for a free trial with Alo Moves and put your Downward Facing Dog into action with the expert techniques you’ve learned here!
Pop quiz! 🧘🤔
You should look between your hands when holding Downward Dog.
The Sanskrit word mukha means dog.
In Downward Facing Dog, its more important to keep your spine long than to straighten your legs completely.
Frequently Asked Questions
What is the Sanskrit name for Downward Facing Dog?
The Sanskrit name for Downward Facing Dog is Adho Mukha Svanasana.
Can beginners modify this pose?
Yes, beginners can use props like blocks or a folded blanket under their hands or heels to ease into the pose.
What are common misalignments in Downward Facing Dog?
Common misalignments include scrunched shoulders, rounded lower back, and misplaced hands or feet which affect alignment.
What are some benefits of practicing Downward Facing Dog?
This pose stretches hamstrings, strengthens arms, improves circulation, and can help boost mental clarity and mindfulness.
Are there any contraindications for doing Downward Facing Dog?
Individuals with wrist, shoulder, or spinal injuries should avoid this asana until cleared by a medical professional for practice.


 16")

 18")
 19")


 22")

