
Key Takeaway
Master Crow Pose (Bakasana) to build full-body strength, improve balance, and set the foundation for advanced arm balances and inversions in your yoga practice.
| CROW POSE | |
|---|---|
| Alternate name: | Bakasana |
| Difficulty level: | Intermediate |
| Pose category: | Arm balance |
| Muscle groups: | Wrist extensors (forearms) Wrist flexors (forearms) Biceps brachii (upper arms) Triceps brachii (upper arms) Deltoids (shoulders) Pectoralis major (chest) Serratus anterior (chest/ribs) Rectus abdominis (abdomen) Obliques (abdomen) Transverse abdominis (abdomen) Adductors (inner thighs) Hamstrings (back of thighs) Quadriceps (front of thighs) Gluteus maximus (buttocks) Trapezius (upper back) Rhomboids (upper back) Erector spinae (back) |
| Physical benefits: | Strengthens wrists, arms, shoulders; improves balance and core strength. |
| Therapeutic applications: | Strengthens wrists, arms, and shoulders; Improves balance and core strength. |
| Preparatory poses: | Garland Pose (Malasana) Boat Pose (Navasana) Forearm Plank |
| Counterposes that follow well: | Child's Pose (Balasana) Garland Pose (Malasana) |
| Chakras activated: | Solar Plexus Chakra (Manipura) |
| Most helpful prop: |  With Expert Guidance, Variations, And Pro Tips For Ultimate Achievement! Crow Pose 1") Blocks under feet - Elevates hips, aids balance. See latest price |
If you’ve been doing yoga for a while, you might be ready to take your practice to the next level by learning a new yoga pose like an arm balance. Or, maybe you’ve been playing around with arm balances and are ready for more? If this sounds like you, keep reading as we’re about to break down the most foundational arm balance pose in yoga – Crow Pose!
Although Crow Pose is considered an intermediate-level yoga posture, even advanced yogis benefit from practicing Bakasana. It uses multiple muscle groups, providing full-body engagement. Achieving a solid Crow Pose in your personal yoga practice will not only build strength, it will also set you up for other arm balances and inversions whenever you feel ready to advance your practice.
Whether you’re looking to learn something completely new, refine your Crow Pose, or spice it up with some variations, this Crow Pose guide is for you!
Contents
Benefits of Crow Pose
In order to achieve Crow Pose, your whole body and mind must work together. Here are all the benefits to adding Crow Pose into your yoga practice:
- Strengthens wrists, arms, and shoulders
- Stretches upper back
- Engages hamstrings and inner thighs
- Improves balance
- Increases core strength
- Improves proprioception (body awareness)
- Promotes mindfulness, breath awareness, and focus
- Builds self-confidence and trust in yourself
Crow Pose
 With Expert Guidance, Variations, And Pro Tips For Ultimate Achievement! Crow Pose 2")
Even for those who are still new to yoga, Crow Pose is an incredibly accessible arm balancing pose. It obviously does require arm strength, but the key to this pose is really about alignment, to help you find your center of gravity. Follow these step-by-step instructions and try it for yourself!
Prefer video? Here’s our complete tutorial on how to do Crow pose:
How To Do Crow Pose: Step-by-Step Instructions
Once you are familiar with Crow, you can explore different ways to enter the pose. For now, try these simple steps.
- Begin in a squatting position. Bring your hands to floor a foot or so in front of you. Place your hands about a shoulder width apart, fingers spread wide, with the middle finger pointing forward.
- Come up onto the balls of your feet and lift your hips without completely straightening your legs.
- Bend your arms – think not-quite-Chaturanga (a little less than a 90 degree bend). Keep your elbows close to your body.
- Bring your knees to your triceps, above your elbows.
- Engage your core by drawing your navel in and up, toward your spine.
- Round through your back body. Think about puffing up across your upper back in a C curve shape. Feel your shoulder blades spread apart.
- Gaze forward, just beyond your hands. Resist the urge to look straight down toward your fingers.
- Begin to transfer your weight forward. Bring your chest forward to counterbalance the weight of your hips and legs behind you.
- Bend one leg, bringing your foot towards your glutes. When you feel stable, bend the other leg, bringing your big toes together, and lift off into your Crow Pose!
- Keep your core strongly engaged and squeeze your inner thighs toward your midline.
- Lastly, remember to breathe! Many people unintentionally hold their breath when trying to balance. But, it actually helps keep you grounded and centered if you let your breath flow.
- To exit the pose, simply release your feet to the floor and gently lower yourself down into Malasana, or Garland Pose.
If you prefer to learn Crow Pose with a video tutorial, watch here:
Variations of Crow Pose
Now that you’ve solidified your crow pose, challenge yourself with these more advanced variations.
Side Crow
 With Expert Guidance, Variations, And Pro Tips For Ultimate Achievement! Crow Pose 3")
Crow pose, with a twist! This asymmetrical balance is a great strengthener for your arms and oblique abdominal muscles.
How To Do Side Crow Pose:
- Begin in the same squatting position as crow pose, with your hands separated and elbows in.
- Bring your feet together and lift your heels. Pivot to turn your knees toward your right.
- Start to shift your body weight forward and bend your elbows to make a shelf with your upper arms.
- Squeeze your legs together and place your hips on your left upper arm, and your knees on your right upper arm.
- Keep leaning forward gradually until you can float both feet up off the ground.
- Hold your Side Crow for a few deep breaths, then lower yourself down and rotate your lower half back to your center.
- Repeat your Side Crow pose on the left side.
Crane Pose
 With Expert Guidance, Variations, And Pro Tips For Ultimate Achievement! Crow Pose 4")
Crane pose is easily confused with Crow as they are quite similar. The difference is in the arms: you keep the elbows bent in Crow Pose. In Crane pose, you find balance with straight arms.
How To Do Crane Pose:
- Begin in the same starting position as Crow, squatting with your hands about shoulder distance apart on the ground in front of you, fingers wide.
- Come up on the balls of your feet and lift your hips high while keeping your knees bent.
- Keep your arms straight and press your knees into your arms, as close to your armpits as possible.
- With straight arms, lean forward slightly until your chest and shoulders pass your wrists.
- Engage your abdominal muscles as you shift your weight.
- Bend your legs, bringing your feet towards your glutes.
- Hold your Crane Pose for a few deep breaths and gently lower yourself back down by shifting your weight back.
Flying Crow
 With Expert Guidance, Variations, And Pro Tips For Ultimate Achievement! Crow Pose 5")
Once you feel solid in your Crow Pose, try this impressive variation with one leg extended.
How To Do Flying Crow Pose:
- Begin in regular Crow with your knees as high on your upper arms as possible, close to your armpits.
- Engage your core, glutes, and hamstrings as you start to hover one knee.
- With control, extend your leg back and hold for a few breaths.
- Slowly bring your extended leg back to rest your knee on your tricep.
- Come down from your Crow Pose, take a few deep breaths, and try it on the other side.
Baby Crow Pose
 With Expert Guidance, Variations, And Pro Tips For Ultimate Achievement! Crow Pose 6")
In this Crow variation, you support yourself with bent arms, forearms grounded as in Dolphin pose. At first glance it might seems like a less intense version of Bakasana since you are closer to the floor. But, you’ll find Baby Crow still requires considerable arm, shoulder, and core strength!
How To Do Baby Crow Pose:
- Begin in a squatting position, feet together and knees separated, and reach your arms forward.
- Bring your palms and forearms to the floor, parallel to each other at a shoulder width distance. Ground down through the outer edges of your wrists.
- Lean forward slightly and bring your knees to the backs of your upper arms. Gaze just past your fingertips.
- Continue to shift forward while engaging your shoulders. Keep your spine rounded just as in regular Crow, shoulder blades spread wide.
- Point your right foot so that it comes up off of the floor, and squeeze your foot towards your glutes.
- Point your left foot and squeeze it toward your glutes so both feet are off the floor.
- When you are ready to exit the pose, carefully release both feet to the floor.
Tripod Headstand
 With Expert Guidance, Variations, And Pro Tips For Ultimate Achievement! Crow Pose 7")
Once you have developed a solid Crow Pose and can shift your body weight with control, try transitioning into or out of Tripod Headstand.
Moving From Crow to Headstand:
- From Crow Pose, lean forward and tuck your chin slightly until the crown of your head touches the floor.
- Now, from this tripod position, squeeze your core muscles to lift your knees off of your upper arms into a tuck position.
- With control, extend both legs straight up towards the sky.
Moving From Headstand to Crow:
- From Tripod Headstand, slowly bend your legs, coming through a tuck position, and place your knees on your upper arms.
 With Expert Guidance, Variations, And Pro Tips For Ultimate Achievement! Crow Pose 8")
- From this tripod position, begin to tilt your center of gravity back. When you are able, lift your head and shift your gaze to a spot on the floor in front of you.
- Engage your core to stabilize yourself and keep your tailbone lifted. Use the strength of your arms to press up slightly and lift your upper body.
- When you are ready, gently release your feet to the floor into a yogi squat.
Crow Pose Tips/Modifications
Mastering crow pose takes curiosity, patience, and lots of practice! Here are some simple modifications and tips if you are just beginning to learn Crow Pose. These modifications will help you achieve optimum alignment and gradually build up your strength.
 With Expert Guidance, Variations, And Pro Tips For Ultimate Achievement! Crow Pose 9")
Tip 1: Use blocks
Start with blocks under your feet to help you get your knees set onto your arms. Essentially you are bringing the ground up to you, shortening the distance needed to get your knees up on to your triceps.
Tip 2: Use a strap
Wrap a yoga strap around your triceps to help keep your elbows pulled in. Using the strap around your upper arms will create some resistance for you to press against, keeping your arms fully engaged while toning and building strength.
Tip 3: Lift one foot at a time
If you are struggling to find your center of gravity and maintain your balance, start by lifting just one foot at a time. Curl your right foot towards your glutes, keeping your left toes resting gently on the floor like a kickstand. Hold for a few breaths, then replace your right foot. Try the same thing on your other side, bending your left leg to bring your left foot towards your glutes.
This is also a great technique to work out your core muscles, arms, and hamstrings while you build the strength needed for full Crow Pose.
How To Prepare for Crow Pose
Crow pose uses many different muscle groups, so it’s important that you properly warm up before practicing this yoga pose. You’ll want to do some core activation, stretch and strengthen your hips, and make sure your upper body is warm.
Here are some suggestions of yoga poses you can practice before crow.
Garland Pose
Warm and open your hips with a deep yogi squat.
How to do Garland Pose (Malasana):
- Begin standing with your feet separated to the outer edges of your yoga mat (a little wider than your hips).
- Angle your toes slightly outwards, heels in.
- Bring your hands to a prayer position in front of you.
- Squat all the way down, letting your hips sink toward the floor.
- Squeeze your upper arms with your inner thighs as you press the elbows out, creating resistance.
- Reach the crown of your head up towards the sky to lengthen your spine.
- Hold your yogi squat for several breaths, then release yourself gently to the floor
 With Expert Guidance, Variations, And Pro Tips For Ultimate Achievement! Crow Pose 10")
Boat Pose
Activate your core and strengthen your hip flexors.
How to do Boat Pose:
- Sit on your yoga mat with your legs in front of you, knees bent and feet planted.
- Place your hands behind your thighs and sit up as tall as you can. Reach through the top of your head to lengthen your spine, and keep your chest open.
- Rock slightly forward so you are balanced on your sitting bones.
- Scoop your low belly in an up, engaging your core.
- Lift one foot off the floor so your leg is bent at a 90-degree angle. When you are ready, lift the other foot.
- Press the inner arches of your feet together and extend your arms forward.
- Hold your Boat Pose for several breaths, then release your feet to the floor and return to an easy seated position.
 With Expert Guidance, Variations, And Pro Tips For Ultimate Achievement! Crow Pose 11")
Forearm Plank
Strengthen your core muscles and shoulders.
How to do Forearm Plank:
- Begin in a tabletop position, on all fours.
- Bend your arms and lower yourself down to your elbows. Align your elbows underneath your shoulders. Ground your palms and forearms into the floor.
- Engage your core muscles, pulling your navel in and up towards your spine.
- Extend one leg back and press into the ball of the foot. Reach the other leg back and come into Forearm Plank.
- Press out through your heels and hold your plank for at least 45 seconds.
- To come down from plank, gently release your knees to the floor and come to a kneeling position.
 With Expert Guidance, Variations, And Pro Tips For Ultimate Achievement! Crow Pose 12")
Child’s Pose (Balasana)
Stretch your back body and shoulders.
How to do Child’s Pose:
- Begin in a kneeling position with your big toes together and knees separated.
- Reach your arms forward and bring your hands to the floor in front of you.
- Keep your hips reaching back towards your heels as you bring your forehead to the floor.
- Feel the crown of your head reach forward as your tailbone reaches back, creating length in your spine.
- Hold your Child’s Pose for several deep breaths. Then, walk your hands back in towards your knees and sit up into a kneeling position.
 With Expert Guidance, Variations, And Pro Tips For Ultimate Achievement! Crow Pose 13")
Sun Salutations
There’s no better way to warm up than taking yourself through a few sun salutations! Pay special attention to your bent arms as you move through Chaturanga, as the position in Crow is quite similar.
How to do Sun Salutations:
- Begin standing in Mountain Pose at the top of your mat.
- Breathe in and reach your arms up over your head.
- Breathe out as you bend over into Forward Fold.
- Lift up halfway as your inhale, lengthening your spine.
- Exhale, plant your hands a shoulder width apart, and step back to plank pose.
- Take a breath in while holding your plank, then exhale to lower down halfway to Chaturanga. Keep your elbows close to your body.
- Inhale to Upward Facing Dog, bringing your chest forward. Keep space between your shoulders and your ears.
- As you exhale, press back to Downward Facing Dog, taking your hips high and pressing your chest towards your thighs.
- After three or so breaths, look forward between your hands and step your feet up to the top of your mat.
- Breathe in and lift up halfway, with your spine long.
- Exhale to forward fold once more.
- Keep your knees slightly bent as your slowly rise to stand all the way up as you inhale. Lift your arms up over your head.
- Finally, exhale and lower your arms, returning to Mountain Pose.
Common Questions about Crow Pose
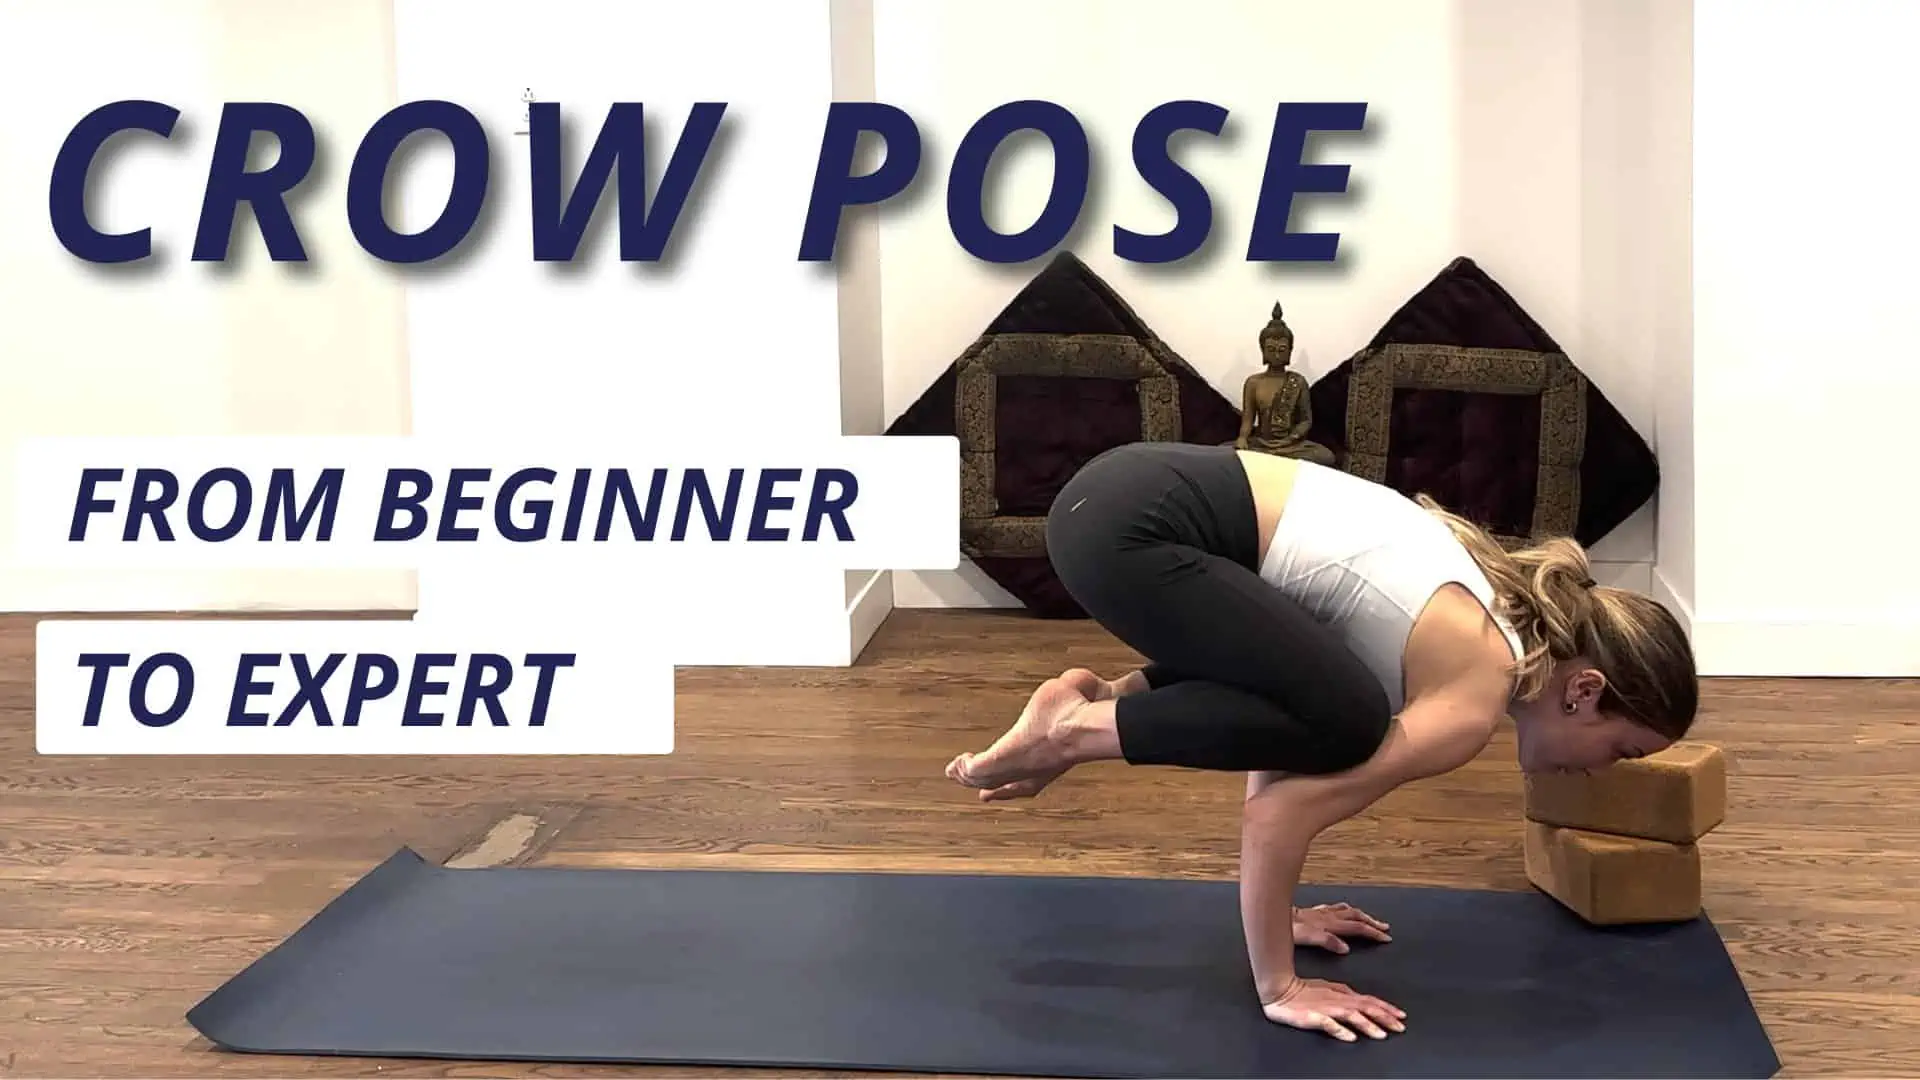
I feel like I’m going to face plant! How do I make sure I don’t fall forward?
Place a foam block standing on its end a few inches in front of you, centered between your hands. That way, if you start to fall forward, your forehead will touch the foam block rather than the floor. Using a block this way is also a good indicator for when you are slightly off balance. Use this technique to help you really find your center.
I feel too heavy and keep falling backwards. How can I lift off?
Think about getting your hips higher, so your body weight is centered rather than pulling you back and down. Tip-toe your feet in as close as you can to your body so your tailbone points up towards the sky, not behind you.
Also, notice your focal point: if you are looking straight down, it will be harder to lift off. Hold your gaze in front of you, just beyond your hands.
How do I avoid wrist pain when practicing Crow Pose?
First of all, if you have chronic wrist pain or carpal tunnel syndrome, do not practice crow pose until you have built the strength necessary. If you have serious concerns, check with a medical practitioner before attempting and arm balances.
If you are just experiencing mild discomfort in crow pose from your wrists bearing the weight of your body, check your alignment! Remember to keep your arms close to your body rather than letting your elbows splay out to the sides. Think about aligning your wrists, elbows, and shoulders all in one line, so your whole arm is holding your weight rather than just your wrists.
My knees keep sliding off my arms. How do I get my legs to stay put?
Again, the first thing to do is check your body positioning. Make sure you start with enough of a bend in your arms to create a little shelf for your knees to rest on. Also, notice where you are placing your knees. If they are too close to your elbows, the weight of your lower body will be too far back and pull you down. Try to tuck your knees high up on your arms, as close to your armpits as possible.